What’s CocoonIO?
[creativ_alertbox icon=”heart” colour=”green” custom_colour=””]Ludei is shutting down their serivce Cocoon.IO. All members have been notified by mail. If you want to migrate to Cordova, you find a guide here. Thank you Ludei, for your outstanding platform. It was an honor working with you![/creativ_alertbox]
CocoonIO is the latest service from ludei to compile your HTML5 games to Android or iOS. Up to now Ludei offers the best performance with their unique Canvas+ engine. With CocoonIO it’s now even possible to add addtional Cordova & Phonegap plugins to your project. If you want to learn more about ludei’s CocoonIO then check out following links.
[creativ_button url=”http://cocoon.io/” icon=”cogs” label=”CocoonIO” colour=”theme” colour_custom=”” size=”medium” edge=”rounded” target=”_blank”] or [creativ_button url=”http:/blog./cocoon.io/” icon=”comment” label=”Ludei’s Blog” colour=”theme” colour_custom=”” size=”medium” edge=”rounded” target=”_blank”]
You can add and maintain 2 projects with the free plan (file size is limited to 50 mb). If you want more, you can check out their upgrade plans over here.
[creativ_button url=”https://cocoon.io/pricing” icon=”heart” label=”Pricing” colour=”dark-gray” colour_custom=”” size=”medium” edge=”rounded” target=”_blank”]
Cocoon Documentation
I also provide some content & tutorials for the new Cocoon Helpdesk. You can find it here.
[creativ_button url=”http://docs.cocoon.io/” icon=”book” label=”Cocoon – Documentation” colour=”theme” colour_custom=”” size=”medium” edge=”rounded” target=”_blank”]
If you miss something here or in the offical doc files, let me know!
What are the benefits from this new technology?
To sum it up, these are the most important benefits from Ludei’s CocoonIO Service.
- Awesome performance on mobile devices
- Expandable with Cordova & PhoneGap plugins
- Small file size
- Sign and align tool included
In the following guide I will explain how to compile an app with CocoonIO from scratch. I’m using Construct 2 to build my HTML5 Games. But you can do this with any HTML5 Framework.
Install the Plugins
With CocoonIO a new or better more new plugins for Construct were released by Ludei. If you build your games with CocoonIO it’s recommended to remove the old ‘CocoonJS’ plugin from your project and to replace the events and actions with the one provided by the new plugin.
Download new Plugins
Cocoon Construct 2 Plugins 0.00 KB 11392 downloads
Download the Cocoon Plugins for Construct 2 now! The download link fetches the latest...This download link has always the latest files and directly downloads the zip file!
Download the zip file by clicking on the ‘Download ZIP‘ button at the right sidebar.
If the download was successfully unzip the package. The plugins are located in the ‘…/src/’ folder. The content should be…
- ads (cocoon-ads)
- cocoon canvas+ (cocoon_canvasplus)
- inapps (cocoon-inapps)
- share (cocoon-share)
- social (cocoon-fb, cocoon-gpg, cocoon-gc)
Important! Do not copy the parent folders like “ads”, but instead enter the folder and copy the “cocoon-ads” folder!
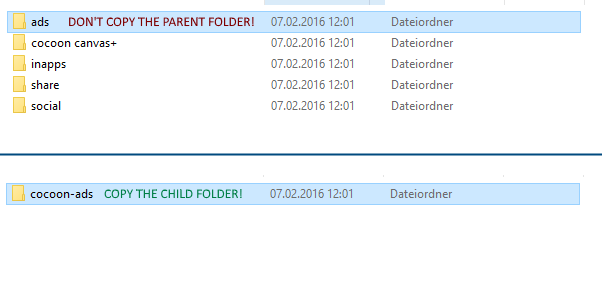
In each of this folder there is another folder. Enter each folder and copy this folder to ‘…/Construct2/exporters/html5/plugins/…’
Then open Construct 2 and check if all plugins are available now.
Build your Game
Construct 2
Basically you don’t need to make adjustments to your project if you already use cordova plugins (for example from cranberrygame). You can directly export it the way it is.
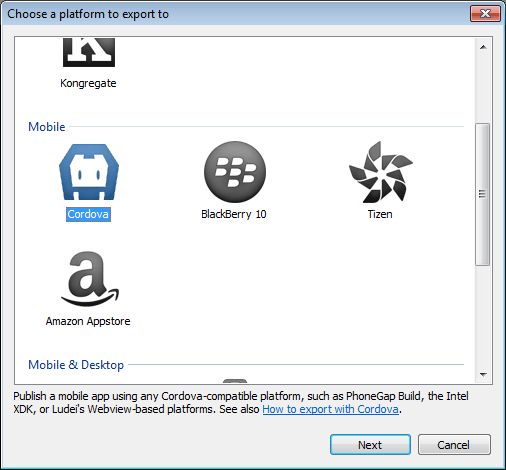
Open your project in Construct 2 and choose ‘Cordova‘ as exporter.
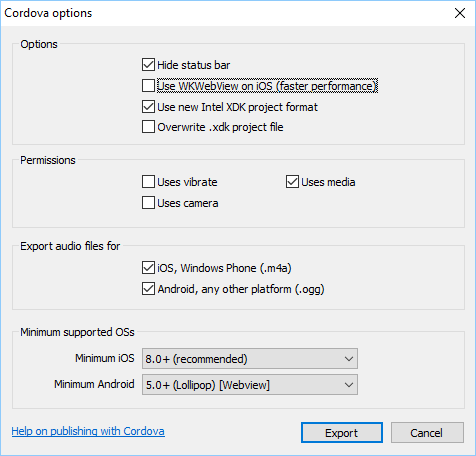
Uncheck ‘Minify Script’.
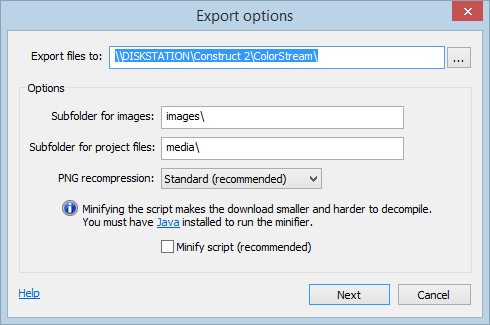
Please make sure the “Use new Intel XDK project format” tick is checked.
As result you will get this folder structure and content.

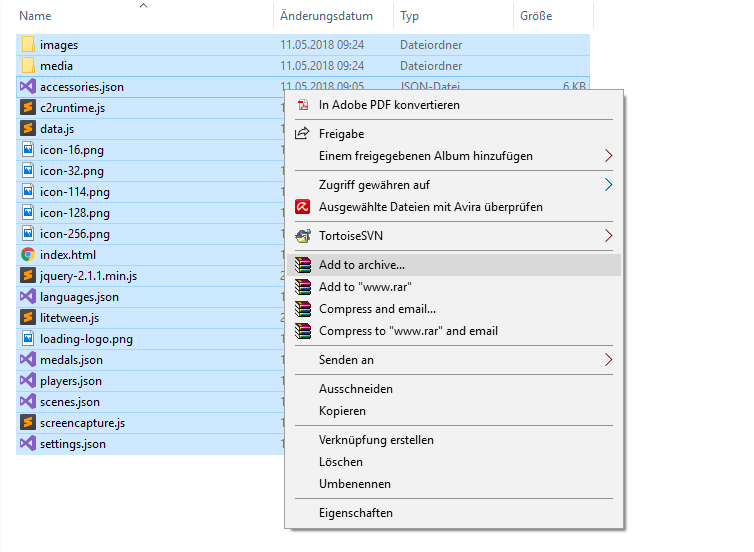
For cocoon, only the “www” folder is important. So enter the “www” folder and zip the content.
[creativ_toggle icon=”info-sign” heading=”For old structure” onload=”closed”]
If you have not selected the tick for “Use new Intel XDK project format“, please perform the steps below.
Open the the export folder and open delete following files
- config.xml
- intelxdk.config.additions.xml (if exisits)

[/creativ_toggle]
Eventually zip all remaining files. This zip file is for uploading in the next step.

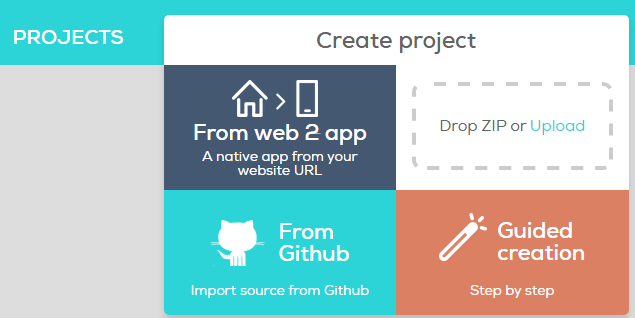
Create a Project
[creativ_button url=”http://cocoon.io” icon=”cogs” label=”CocoonIO” colour=”theme” colour_custom=”” size=”medium” edge=”rounded” target=”_blank”]
Login in and create a new project by uploading the zip file from the previous step. Just Drag’n’Drop the ZIP file in the area ‘Drop ZIP or Upload’.

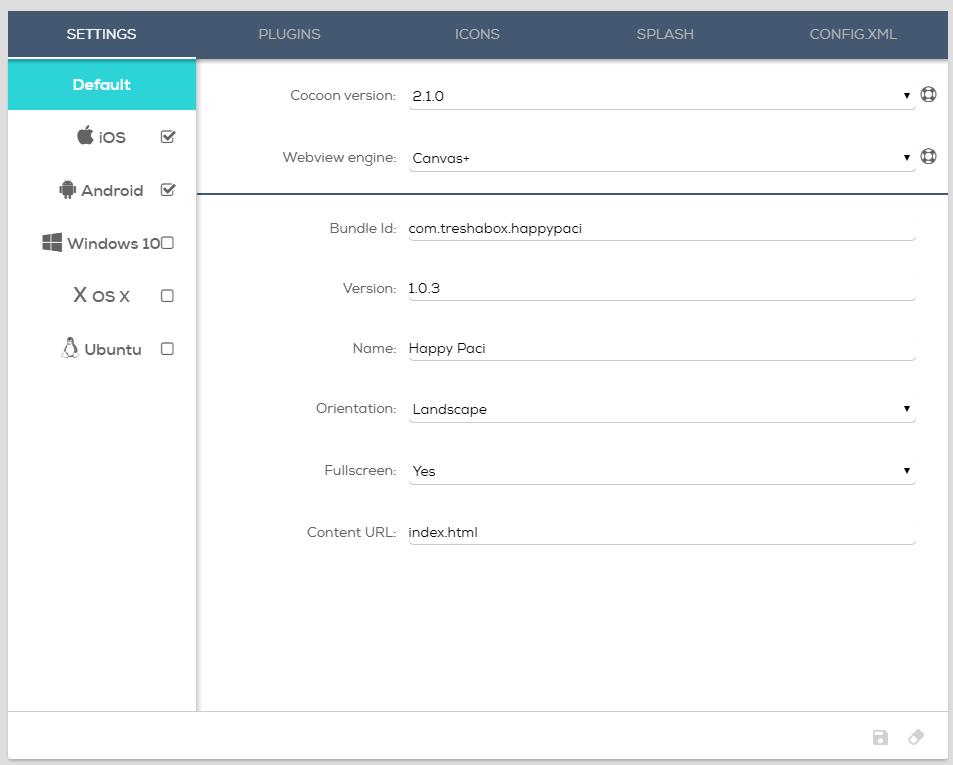
Settings
Your project will then be created. After that, open the project and visit the ‘Settings’ tab and enter your details.
Plugins
Visit the Plugins tab in order to install all needed plugins.

For all cranberrygame plugins, add the “Git Repo URL” at the “Custom” section.
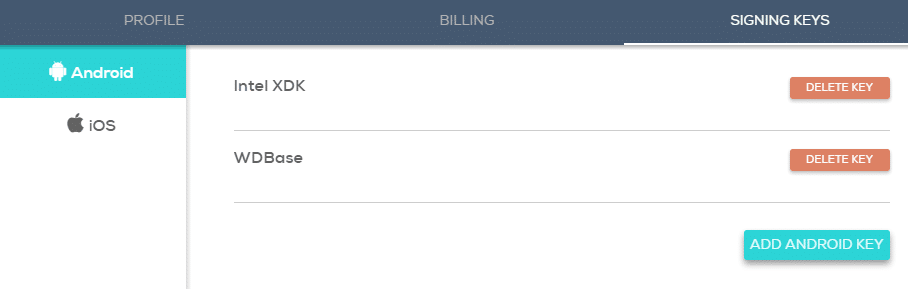
Keys and Certificates
CocoonIO allows you to upload signing keys to directly sign and align your game. Depending on tthe platform you will need diffrent key formats.
First go to to your CocoonIO Profile and select “Signing Keys” or click on the link below.
[creativ_button url=”https://cocoon.io/me” icon=”user” label=”Key Management” colour=”blue” colour_custom=”” size=”medium” edge=”rounded” target=”_blank”]
[creativ_accordion][creativ_toggle accordion=”1″ icon=”book” heading=”Android – KeyStore” onload=”closed”]
If you are not familiar what a keystore file is, please visit this tutorial and create a new keystore file.
[creativ_button url=”https://shatter-box.com/knowledgebase/android-apk-signing-tool-apk-signer/” icon=”book” label=”Create a KeyStore file” colour=”green” colour_custom=”” size=”medium” edge=”rounded” target=”_blank”]
Then select Android and click on ‘Add Android Key‘.
Now enter all your information needed.

- Title: Can by any title you wish (just to identify the key in the selection)
- Alias: The alias used for the key creation
- Certificate password (Alias password): The used password
- KeyStore password: The used password
- KeyStore: Your generated keystore file
[/creativ_toggle][creativ_toggle accordion=”1″ icon=”book” heading=”iOS – Provisioning Profile & p12″ onload=”closed”]
Firstly you need to create your certificates in your Apple Developer Account.
[creativ_button url=”https://developer.apple.com/account/ios/certificate/” icon=”user” label=”Apple Developer – Certificates” colour=”blue” colour_custom=”” size=”medium” edge=”rounded” target=”_blank”]
You’ll need a certificate for Production and for Development.
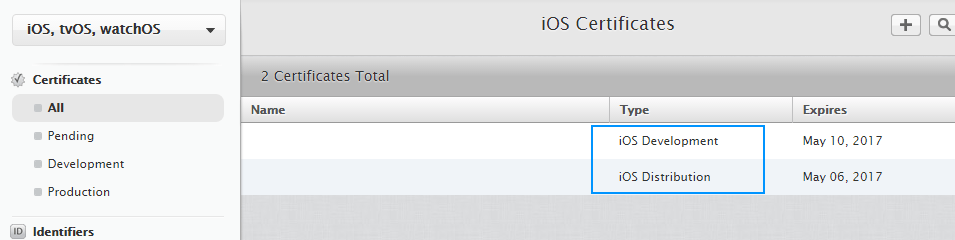
Just click on the corresponding tab (Development or Production) and follow the steps to create a certificate for it.
[creativ_alertbox icon=”info-sign” colour=”blue” custom_colour=””]It’s not necessary to add an iOS key to your CocoonIO Account. If you do not select any key, you’ll get a xcode archive file. Open this with XCode and you can export your Game for production / development as well. But if you do add a a key, you will directly get an .ipa file.[/creativ_alertbox]
Provisioning Profile
In order to get your Provisioning Profile open XCode on your Mac Computer and select Preferences.
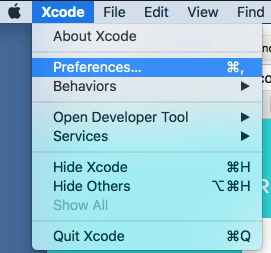
Then select your Developer Account and click on View Details.
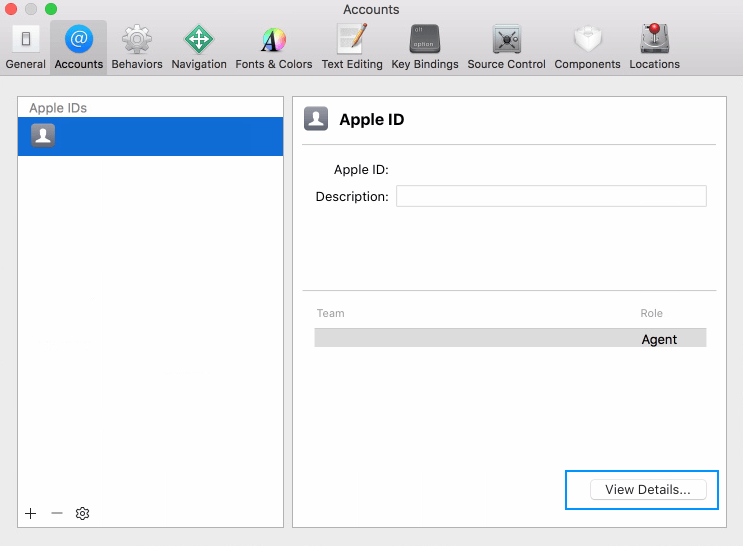
Then perform a right-mouse click on your certificate and click on Show in Finder.
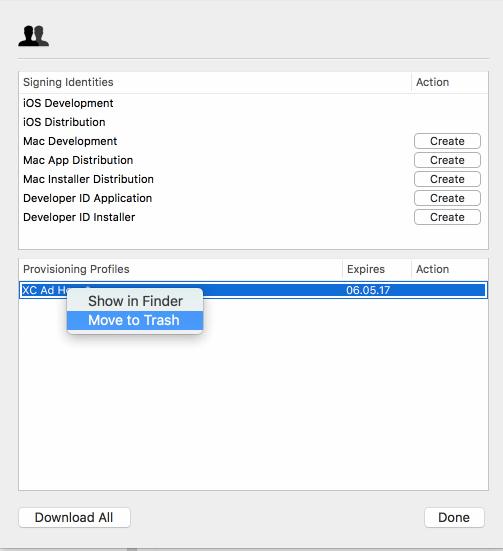
Hint: Rename it for better identification.
p12 Certificate
Open the Keychain Access application (in the Applications/Utilities folder) and select your certificate.

If the shown entries are missing, download your certificates from your Apple Developer Account first and then perform a double click on the corresponding certificate. This will add it to the Keychain Access App.
Perform a right mouse click on the corresponding certificate and choose “Export”.
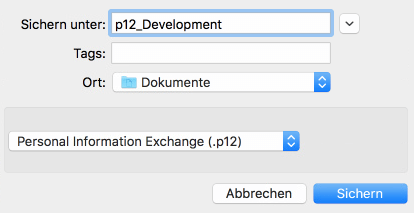
Give it a proper name, so it can be identified later.
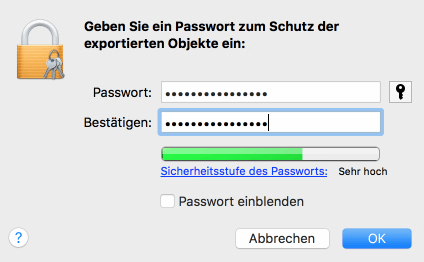
Then add a password. This password is the password you have to add later on CocoonIO!
[creativ_alertbox icon=”info-sign” colour=”green” custom_colour=””]Always use a Distribution Provisioning Profile and a Production Signing Certificate.[/creativ_alertbox]
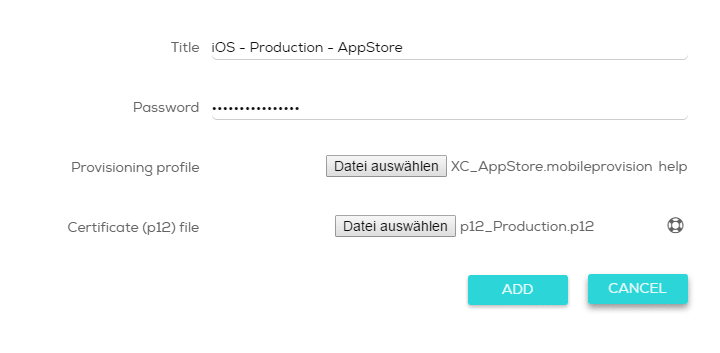
- Title: Can by anything
- Password: The password for the p12 certificate (the one you have chosen for the export)
- Provisioning profile: AppStore / AdHoc
- Certificate (p12) file: your p12 Certificate (Production)
Now add all your details and click Add.
[/creativ_toggle][/creativ_accordion]
Compile your Game
[creativ_button url=”http://cocoon.io/” icon=”cogs” label=”CocoonIO” colour=”theme” colour_custom=”” size=”medium” edge=”rounded” target=”_blank”]
Available WebView Engines
[creativ_button url=”https://cocoon.io/doc/canvas_plus” icon=”cogs” label=”Canvas+ (recommended)” colour=”theme” colour_custom=”” size=”medium” edge=”rounded” target=”_blank”] [creativ_button url=”https://cocoon.io/doc/webview_plus” icon=”cogs” label=”WebView+” colour=”theme” colour_custom=”” size=”medium” edge=”rounded” target=”_blank”] [creativ_button url=”https://cocoon.io/doc/webview” icon=”cogs” label=”WebView” colour=”theme” colour_custom=”” size=”medium” edge=”rounded” target=”_blank”]
I recommend Canvas+ due it’s awesome performance and small file size. But in the end, it’s up to you what to choose. You can change this at the ‘Settings’ tab.
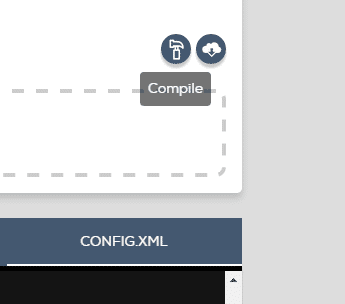
Select a keystore or certificate file
Select your key from the list below. If you have not added a key yet, go to the chapter “Keys & Certficates” above.

After that, go back up and click on the small ‘Compile‘ button and your game will be compiled.
Need help?
Please visit this topic at the cocoonio forum.
[creativ_button url=”https://forums.cocoon.io/t/construct-how-to-build-with-cocoonio-tutorial/45″ icon=”comments” label=”Aks for help!” colour=”theme” colour_custom=”” size=”large” edge=”rounded” target=”_blank”]
Debug
The Cocoon Construct 2 plugins (Ads, Canvas+, Facebook, and so on) doesn’t work in your browser preview. Therefor you need to export your game with Cordova, zip those files and run the zipped game files in your Developer App. The developer app represents exactly your game. It has the same Bundle ID and Version code. Otherwise you could not test services like InApp Purchases or the Google Play Game service by Google.
[creativ_accordion][creativ_toggle accordion=”1″ icon=”stethoscope” heading=”With Android” onload=”closed”]
The Developer App for Android
You can create a developer app for each project at cocoon.io.
Note: Like mentioned above, the Developer App has the same properties as the live apk file later, so it will overwrite your existing installation (if you have an older version of your game installed).

Click on ‘Compile Developer App’. This may take awhile. Once the app is ready you can download it here.
You also get notifed via mail. Then you can download the Developer App directly to your phone and install it (the most devices are working with the ARM version).
[/creativ_toggle][creativ_toggle accordion=”1″ icon=”stethoscope” heading=”With iOS” onload=”closed”]
The Developer App for iOS
If you want to test your game on iOS you can download the official iOS Developer App from Ludei. You can download it below.
[appbox appstore 1056624361]
Generate your own Developer App
You also can create your own developer app. It works like on Android.
Click on ‘Compile Developer App’. This may take awhile. Once the app is ready you can download it here.
[/creativ_toggle][/creativ_accordion]
How to debug your Game in Construct 2
Open your project you want to debug with Construct 2 and export it to Cordova. Open the folder where you exported the files.
- Delete: intelxdk.config.additions.xml
- Delete: config.xml
The plugin information are already included in the Developer App, so you don’t need those two files above.
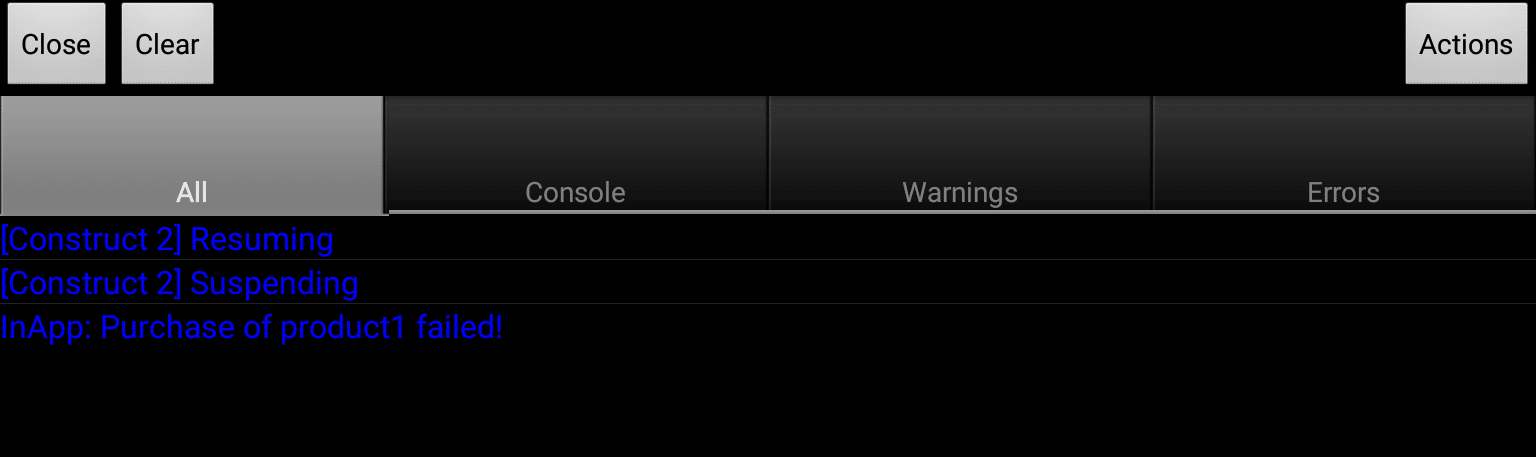
It’s very important to test your game in the Developer App first, so you don’t have to compile a new apk file for each little changes. Also if you stuck and you cannot locate the issue, will the Developer App help you to find and fix the issue. For this you can use the “Browser” object provided by Scirra in Construct 2. This plugin has the action “Log”, so you can log events in the console while running the game in your Developer App.
If you now run this game in your Developer App, you can see the events in the console log.
Zip the files
If you have performed all steps above you can zip the content and upload it to your test device (where the developer app is installed).


Then choose the engine you want to use. I personally recommend Canvas+ due it’s awesome performance.
Now you’re able to debug your app without compiling it. This makes the whole process much easier than compiling each changes.
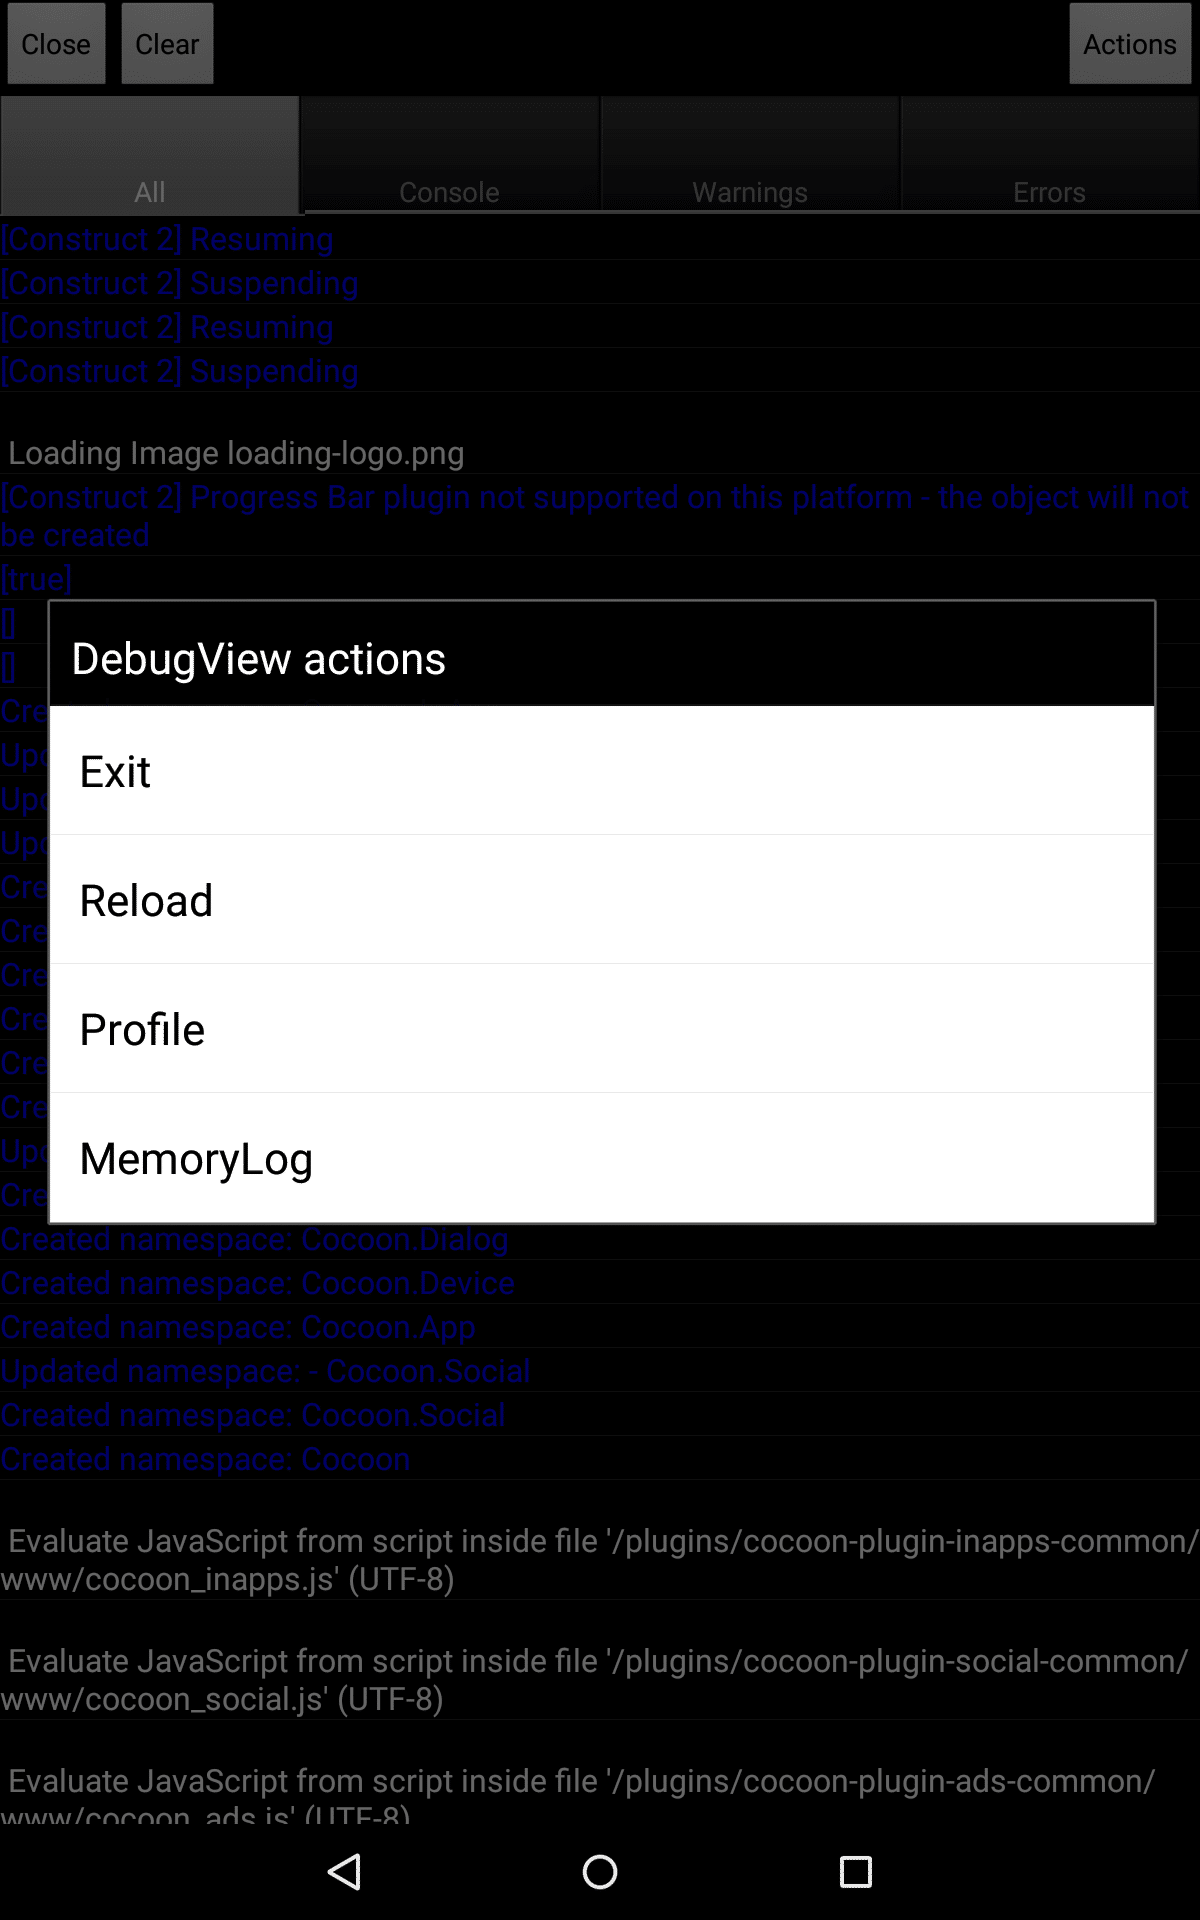
The Developer App comes along with a debug console. There you can see the log (Warnings & Errors).
Fetch game files via an URL
Here you find some information how to run your game via an URL.
[creativ_accordion][creativ_toggle accordion=”1″ icon=”link” heading=”Via Dropbox” onload=”closed”]
- 1) Upload your zipped game files to your dropbox account (if you don’t have one, click the button below)
[creativ_button url=”https://db.tt/JCcLl70v” icon=”ok” label=”Create a new DropBox Account” colour=”blue” colour_custom=”” size=”medium” edge=”rounded” target=”_blank”]
- 2) Release your file and copy the link
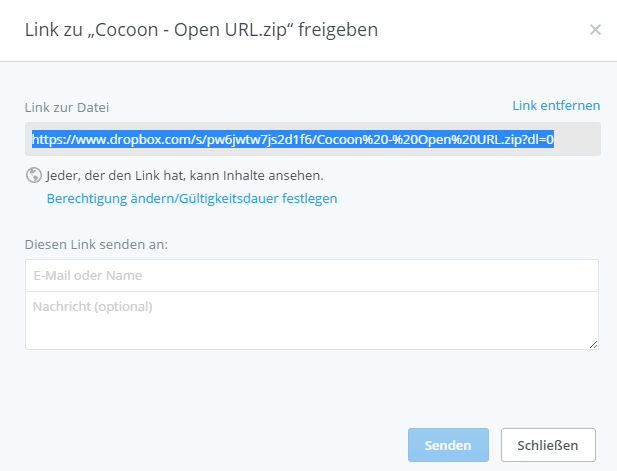
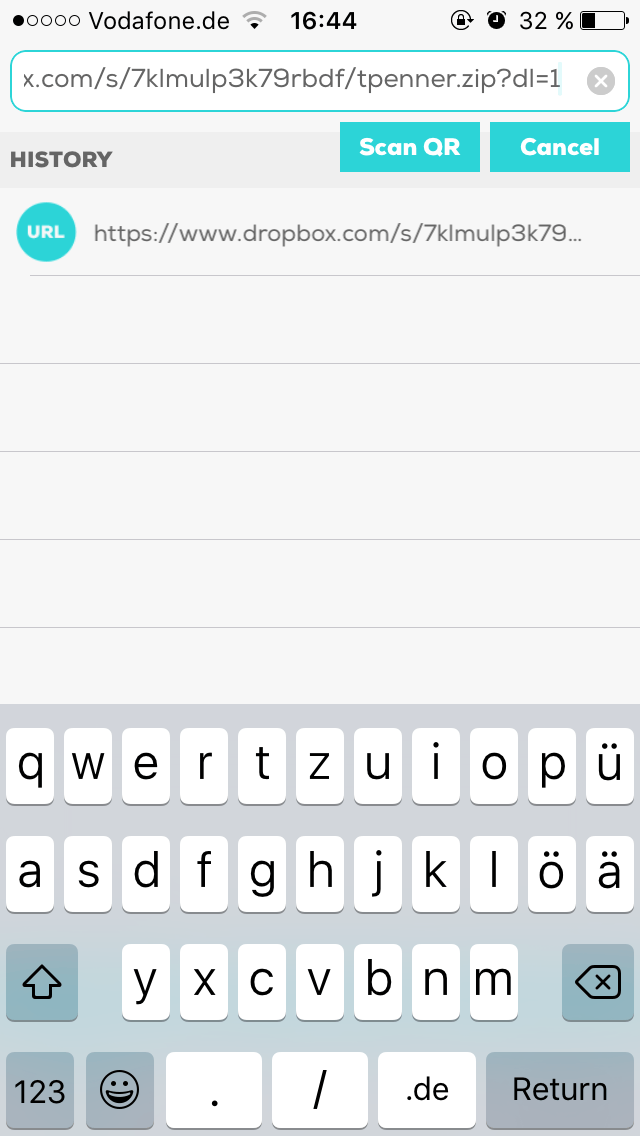
- 3) Adjust the URL by replacing the ?dl=0 to ?dl=1
[code]https://www.dropbox.com/…/your_game.zip?dl=1[/code]
Maybe you have to copy the URL in a text editor first.
- 4) Create a QR-Code (optional, but recommended)
Copy your link and create a QR Code from it.
[creativ_button url=”http://www.qrcode-generator.com/” icon=”cogs” label=”Generate a QR-Code” colour=”green” colour_custom=”” size=”medium” edge=”rounded” target=”_blank”]
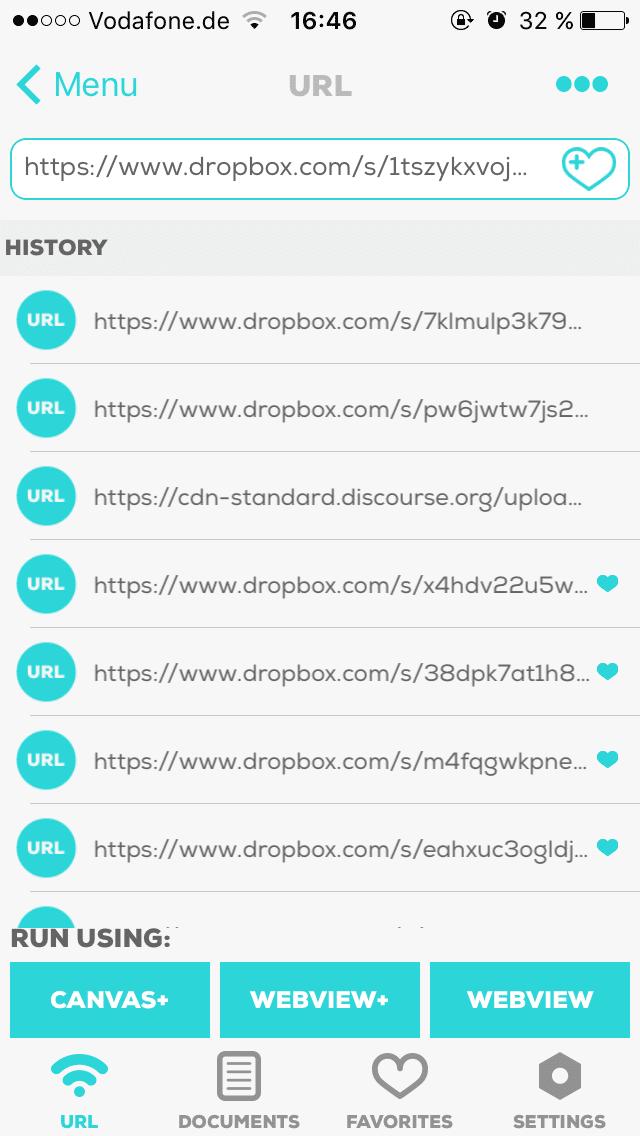
- 5) Scan the QR-Code in your Developer App or add the URL manually
- 6) Run the file
[/creativ_toggle][/creativ_accordion]
Icon & Splashscreen
Add an own Splash Screen
If you want to add your own Icon or Splashscreen then
- Click on your project -> Settings
- Choose the Icon tab and upload your icon (1024 x 1024 px)
- Choose the Splash tab and upload your splash screen (2048 x 2048 px, png)*
*) Your custom splashscreen will appear after the cocoon default splash screen.
Platform specific hints
Remove Splash Screen
You can remove the Ludei “CocoonIO” splash screen for a fee. This must be purchased for each project (bundle ID) individually. Just visit the “Slpash” tab of your project.
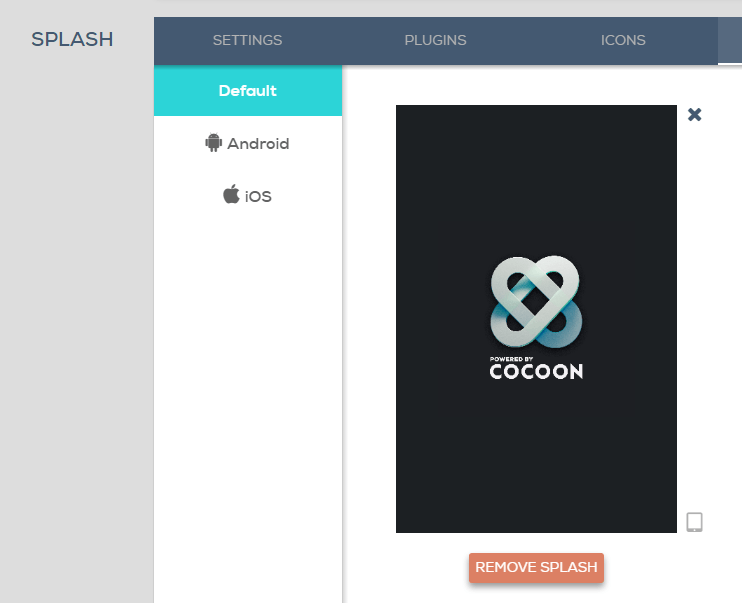
Then click on “Remove Splash”
Avoid Black Screens
Some uses have expired some black screen gaps of 2-6 seconds shown after the “Cocoon” splash screen was shown. To avoid or minimize the gap time, you can add a custom loader layout in your C2 Project. For this apply following settings to your project.
First layout: Loader (this Layout must be created first)
Loader layout: Yes
Loader style: Progress bar & logo
You can make a custom loader bar or just show your splash on that layout. That’s completely up to you.
Then switch to the event sheet of the Loader Layout and add following line.
LoaderEventSheet:
[code]On loader complete > Go to “MainGame”[/code]
You find a complete guide over here.
[creativ_button url=”https://www.scirra.com/tutorials/318/how-to-use-loader-layouts-to-make-custom-loading-screens” icon=”book” label=”Custom Loader Layouts” colour=”green” colour_custom=”” size=”medium” edge=”straight” target=”_blank”]
CocoonAds
Ad ID’s
First of all we need to add our ad ID’s (AdMob).
[creativ_button url=”https://apps.admob.com/#monetize” icon=”arrow-right” label=”AdMob (Go to your Account)” colour=”red” colour_custom=”” size=”medium” edge=”rounded” target=”_blank”]
When you are logged in into your account select the app from which you want to use the ID’s.

Copy both ID’s and insert it to the CocoonAds Plugin in your C2 project.
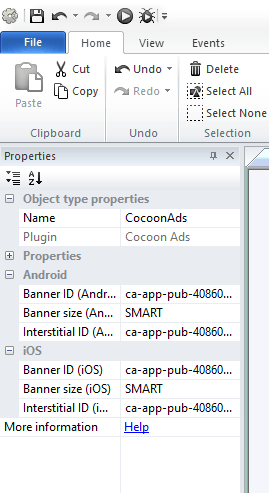
Install the Plugin in the cloud compiler
CocoonGooglePlayGames
In order to use the Google Play Games Function in your game you must have uploaded an apk file to the Play Store (beta phase).
Upload your Game
First visit your Google Play Developer Console. If you don’t have an account yet, create one.
[creativ_button url=”https://play.google.com/apps/publish/” icon=”arrow-right” label=”Google Play Developer Console” colour=”blue” colour_custom=”” size=”medium” edge=”rounded” target=”_blank”]
The fee for a new account is 25$. This is a one-time payment. After that, there are no recurring payments to made like on the ITunes Store.
Build your Game
In order to upload an apk file to the store you must compile it first.
[creativ_button url=”https://shatter-box.com/knowledgebase/cocoonio-how-to-build-a-game-using-construct-2/#document-3″ icon=”arrow-up” label=”How to build with CocoonIO” colour=”green” colour_custom=”” size=”medium” edge=”straight” target=””]
Create a new App
If you already have created an app at your Google Play Dev. Console you can skip this step.

Click on ‘All Apps‘ and then on ‘+ Add new App‘ (in German: + Neue App hinzufügen).
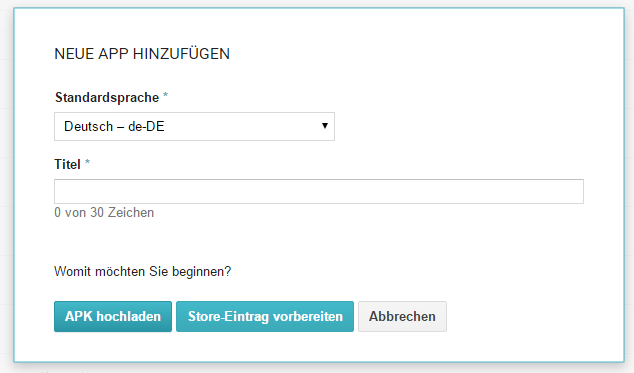
Enter the title of your game and click on ‘Upload APK‘ (in German: APK hochladen).
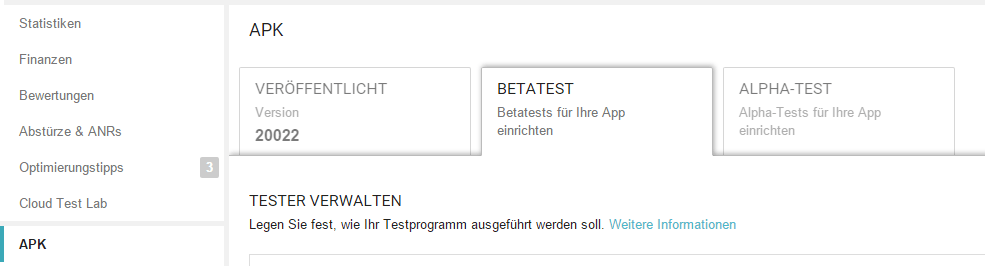
Now switch to the ‘BETATEST’ tab and choose ‘Upload first APK-File in Betaphase‘ (in German: Erste APK-Datei in Betaphase hochladen).

If the upload was successfully it will take awhile till your app is reachable via the test link.
Create a Game Service
Go to the tab ‘Game Services‘ (in German: Spieldienste) and click on ‘+ Add new Game‘ (in German: + Neues Spiel hinzufügen)

Then enter the details of your game. It’s recommended to use the same name that you used on your game.
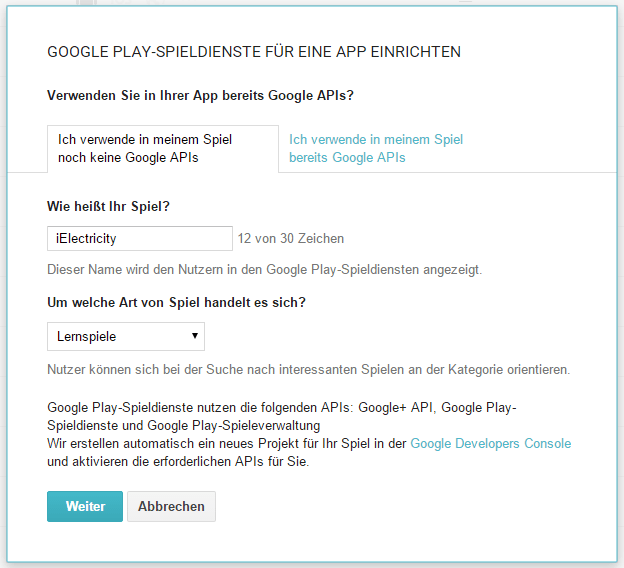
Click on ‘Next‘ (in German: Weiter) and go to the tab ‘Associated Apps‘ (in German: Verknüpfte Apps) and select the platform you want to associate with the current game service.

I want to add an Android game, so I choose Android as platform.

Copy your Google Play Game ID and change to your CocoonIO Account.
[creativ_button url=”https://cocoon.io/home” icon=”arrow-right” label=”CocoonIO Compiler” colour=”orange” colour_custom=”” size=”medium” edge=”straight” target=”_blank”]
Then select your Project (if you have none, create one) and click on the tab ‘Plugins‘ and select ‘Cocoon‘, search for the Plugin ‘Google Play Games Social API‘ and click ‘Install‘.

The installer will create automatically a parameter called APP_ID. Insert here as value your Google Play Game ID.
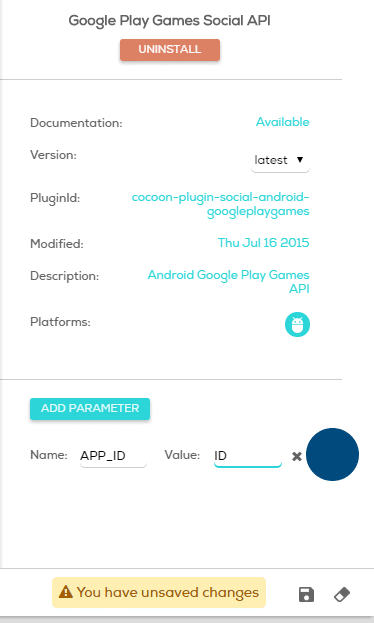
Then save your settings.
Compile your game
Eventually you can compile your game.
[creativ_button url=”https://shatter-box.com/knowledgebase/cocoonio-how-to-build-a-game-using-construct-2/#document-5″ icon=”arrow-up” label=”How to compile with CocoonIO” colour=”green” colour_custom=”” size=”medium” edge=”straight” target=””]
Additionals
[creativ_accordion][creativ_toggle accordion=”1″ icon=”plus” heading=”Add a Leaderboard” onload=”closed”]
Add a new leaderboard
In order to do so, select the “Leaderboard” tab and then click on “Add new Leaderboard”.

Then give your leaderboard a name (can be anything) and choose the format for the score.
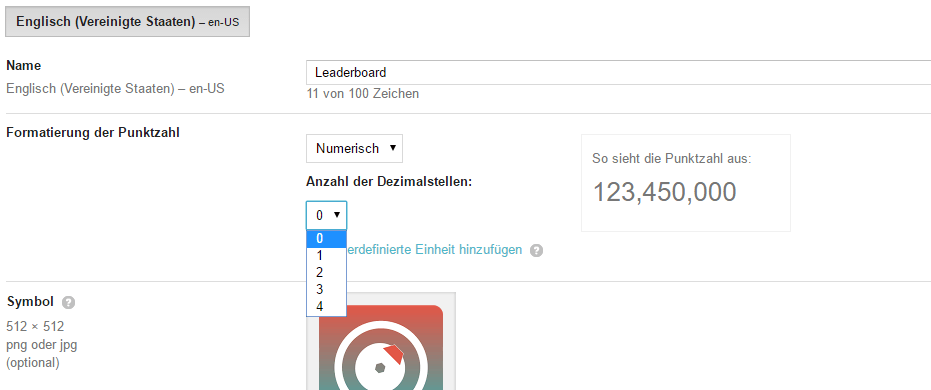
Then deactivate the tamper protection. Otherwise only your own score will be shown in the leaderboard.

When you feel ready, save it and copy the ID. This is the ID you need to use in your Construct 2 project for “Open Leaderboard“.
[/creativ_toggle][creativ_toggle accordion=”1″ icon=”plus” heading=”Add an Achievement” onload=”closed”]
Add an Achievement
In order to add a new achievement, select the “Achievement” tab and click on “Add new achievement”. You have to add at least 5 achievements before you can publish your Play Service.
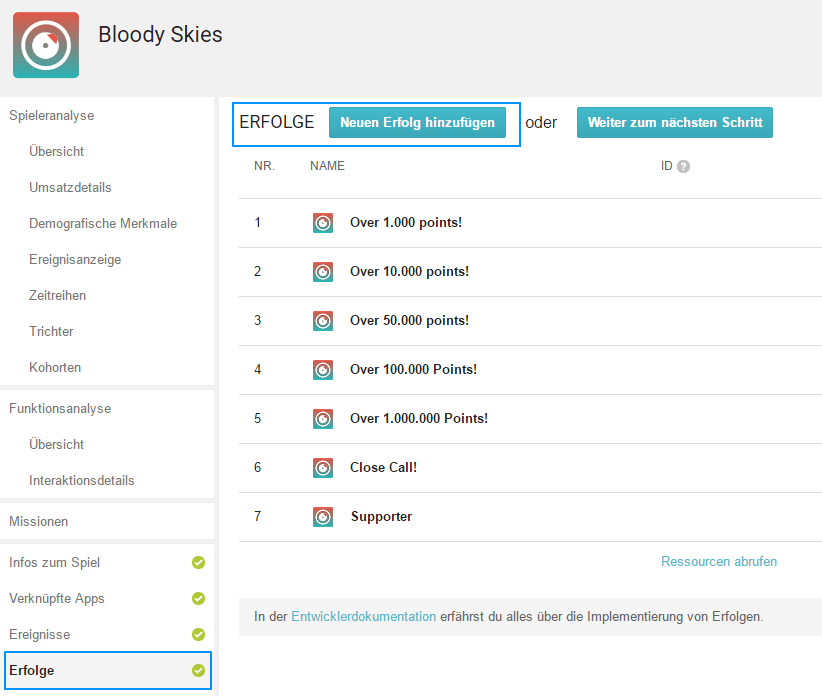
Enter all needed information and an icon (512 x 512 px, png) and click on save.
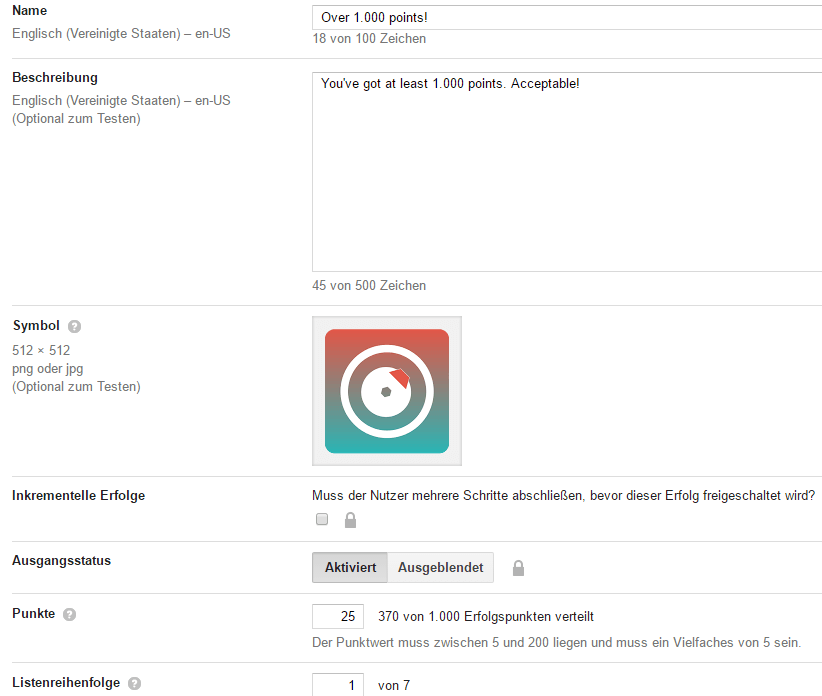
Then copy the ID and use it to “Submit an Achievement” in your Construct 2 project.
[/creativ_toggle][/creativ_accordion]
CocoonInApp
Create Products
Please login to your Google Play Dev. Console and select your game.
[creativ_button url=”https://play.google.com/apps/publish/” icon=”user” label=”Google Play Developer Console” colour=”green” colour_custom=”” size=”medium” edge=”straight” target=”_blank”]
Then select “InApp Products”. If this is your first visit of this tap you may need to connect your Merchant Account with your Developer Console. If you don’t know how to connect your merchant account with your developer console, please visit this link.
[creativ_button url=”http://developer.android.com/distribute/googleplay/start.html” icon=”credit-card” label=”Connect Merchant Account” colour=”green” colour_custom=”” size=”medium” edge=”straight” target=”_blank”]
If your account is connected, then click on ‘+ Add new Product’.
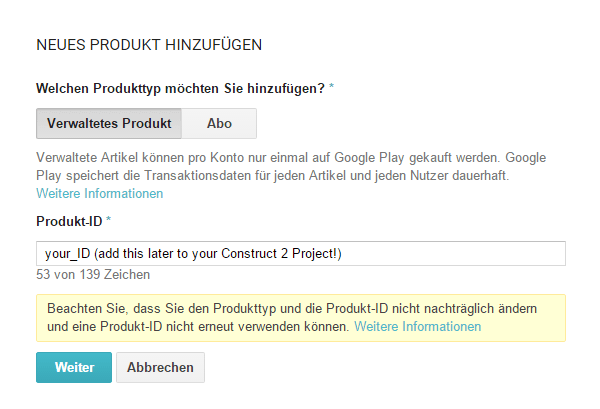
[creativ_accordion][creativ_toggle accordion=”1″ icon=”question-sign” heading=”Managed Product” onload=”closed”]
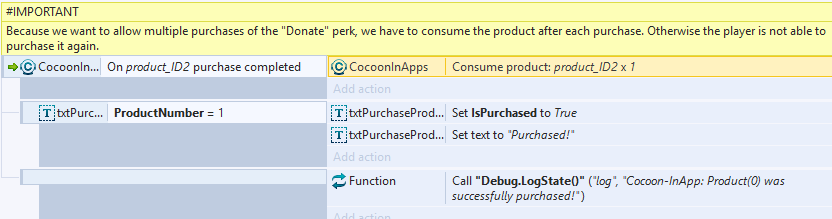
If an item is set as managed it only can be purchased once from the player. This is recommended for perks like “Remove Ads” or something like that. All managed products can be restored by using the “Restore” action from the CocoonInApp plugin.
If you want to allow multiple purchase of a managed product, you have to consume it after the purchase. This is needed if you want to offer in-game currencies like coins, gems or something like that.
[creativ_button url=”https://goo.gl/OOU1ye” icon=”” label=”Cocoon – Game Store Template (Construct 2)” colour=”green” colour_custom=”” size=”medium” edge=”rounded” target=”_blank”]
[/creativ_toggle][creativ_toggle accordion=”1″ icon=”question-sign” heading=”Subscription” onload=”closed”]
An subscription isntead is a recurring purchase depending on the set time interval. You can use this kind of item for a “Premium” perk. Aslong the player pays the recurring fees he is a premium user, once he stops, he will loose the state of being premium (and all benefits of being a permium user).
[creativ_alertbox icon=”remove-sign” colour=”red” custom_colour=””]Please note, up to now Subscriptions aren’t supported by the Google Play InApp plugin![/creativ_alertbox]
[/creativ_toggle][/creativ_accordion]
Confirm the dialog and enter all needed information about the perk, like prices and the description. Once you are done click on Save & Activate.
Insert the ID’s
In order to allow the purchase of the item you need to add its ID to your Construct 2 project. The best way to do this is to use global variables (or local). If you using our Cocoon Developer Template you will find 3 variables called:
- Product1
- Product2
- Product3
Just add your ID there (Product 1 = removeads for instance).
You can download our free capx examples here.
[creativ_button url=”https://shatter-box.com/?p=14582″ icon=”heart” label=”Cocoon Developer Template” colour=”green” colour_custom=”” size=”medium” edge=”straight” target=”_blank”]
There you will find a complete code example for the InApp Purchase Function.
Construct 2 Example Project
If you don’t know how to get started, feel free to download our free code example.
coming soon…
CocoonInApps – Plugin References
Triggers
The triggers are self-explaining.
Actions
Here you find all needed information for the actions.
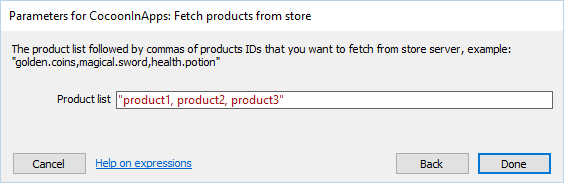
[creativ_accordion][creativ_toggle accordion=”1″ icon=”share-alt” heading=”Fetch Products from Store (product_ID1, … , product_IDx)” onload=”closed”]
On the start of the Layout check if “Is Canvas+” && “Is store avaiable” are true, before you call “Fetch Products from Store”.
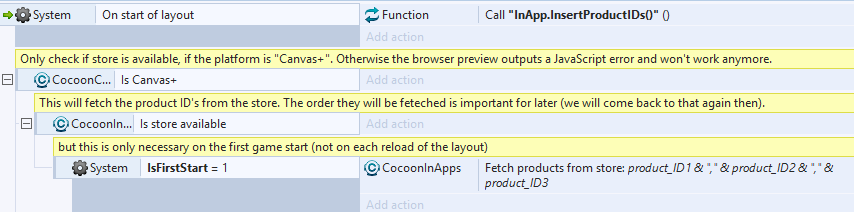
You must pass a comma separated list of your product_ID’s.
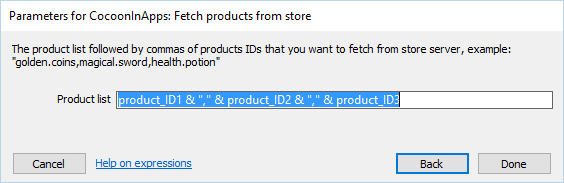
I’m using variables to store my ID’s. If you do not use variables (what’s not recommended) you can add it also like this.
This action will either trigger “On Products fetch completed” or “On Products fetch failed“.
[/creativ_toggle][creativ_toggle accordion=”1″ icon=”share-alt” heading=”Update Products List” onload=”closed”]
This action will return the cached Products and will create the “product_list” which is needed to access the product description, title, price and so on. So call this action whenever you have successfully fetched your items from the store. An example is shown below.
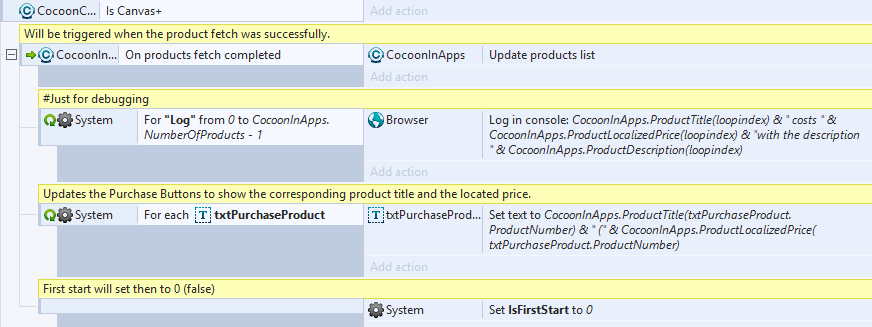
Note
It’s no matter in which order you fetch the products. The list always will be sorted ascending from a to z based on your product ID (not the name). So an example.
- product_id1 = shatter_remove_ads
- product_id2 = shatter_donate
- product_id3 = shatter_coins_1000
So the list will be setup as shown below
- Index-0: product_id3 (shatter_coins_1000)
- Index-1: product_id2 (shatter_donate)
- Index-2: product_id3 (shatter_remove_ads)
Then use the index (0, 1, …. x) in order to access the product details.
Check products list
If you want to be sure, you can log the list like this:
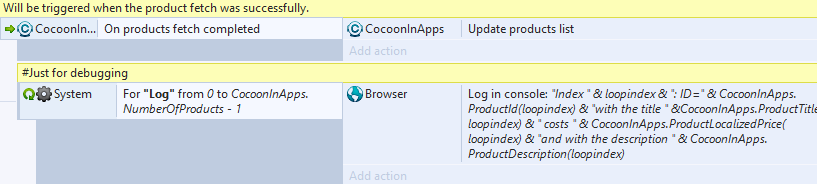
[code]
“Index ” & loopindex & “: ID='” & CocoonInApps.ProductId(loopindex) & “‘ [with the title ‘” &CocoonInApps.ProductTitle(loopindex) & “‘ costs ‘” & CocoonInApps.ProductLocalizedPrice(loopindex) & “‘ and with the description ‘” & CocoonInApps.ProductDescription(loopindex) & “‘]”
[/code]
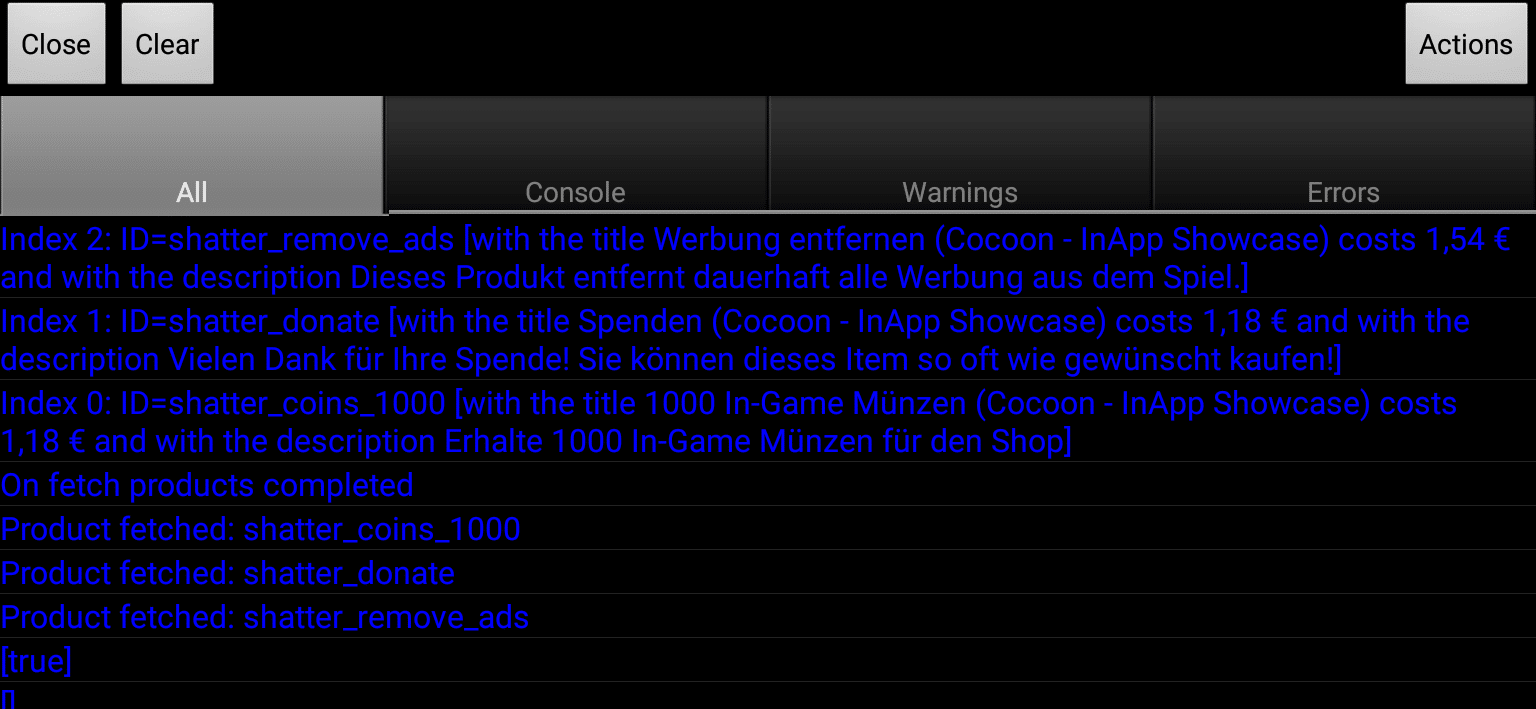
The log will look like this then.
[creativ_alertbox icon=”warning-sign” colour=”yellow” custom_colour=””]IMPORTANT!
If you want to access the CocoonInApp expressions you have to call the “Update Products List” first! You find an overview off all plugin expressions below. [/creativ_alertbox]
[/creativ_toggle][creativ_toggle accordion=”1″ icon=”share-alt” heading=”Purchase Product (Product ID(string))” onload=”closed”]
Opens the purchase dialog for the passed product ID (string).
You either can do this by passing the ID directly (as variable or as “productid”).
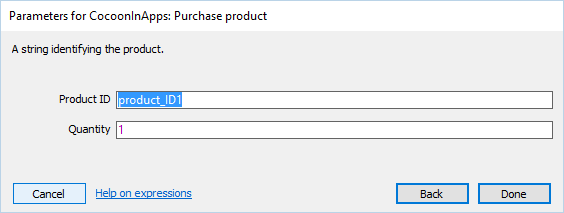
or with the index of the product.
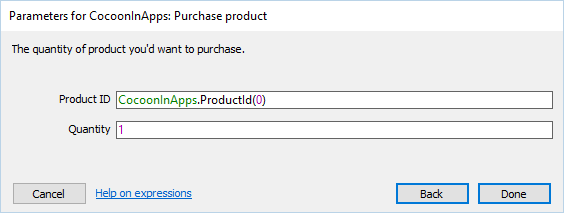
This depends on your function.
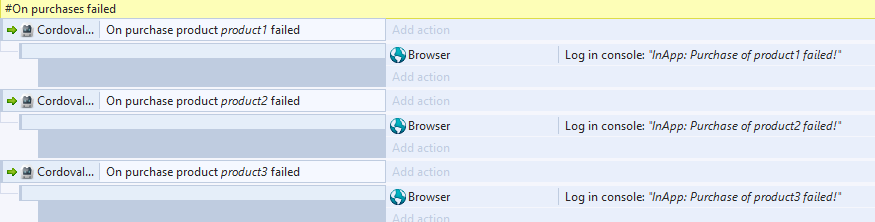
This action will either trigger “On purchase product completed” or “On purchase product failed”.
[/creativ_toggle][creativ_toggle accordion=”1″ icon=”share-alt” heading=”Consume Product (Product ID(string))” onload=”closed”]
If you consume a purchased product, then it can be purchased again. This is relevant if you want to offer perks which can be purchased more than once (in game coins, power ups and so on). So whenever a purchase of such an item has completed, consume it.
[/creativ_toggle][creativ_toggle accordion=”1″ icon=”share-alt” heading=”Restore Purchases” onload=”closed”]
This action will restore all purchases from the store and then call “On purchase complete” for the relevant products. In my eyes this is currently a bug. It actually should only call “On Restore purchases completed / failed“. And set the “Is product_id purchased” to true or false.
I notifed ludei about that. If there are any news, you will see it here.
[/creativ_toggle][/creativ_accordion]
Expression
Here you find all needed informations for the CocoonInApp Expressions.
[creativ_accordion][creativ_toggle accordion=”1″ icon=”pencil” heading=”NumberOfProducts” onload=”closed”]
This expression returns the currently cached products (the length of the products_list object) as integer.
[js] // products information
Exps.prototype.NumberOfProducts = function(ret)
{ ret.set_int(products_list.length); };
[/js]
In order to access this value, call “Update Products List” first.
[/creativ_toggle][creativ_toggle accordion=”1″ icon=”pencil” heading=”ProductDescription(index(integer))” onload=”closed”]
This expression returns the description as string of the product at the passed index (0-based integer) from the product_list.
[js]
Exps.prototype.ProductDescription = function(ret, index) {
index = Math.floor(index);
if (index < 0 || index >= products_list.length) {
ret.set_string(“”);
return;
}
ret.set_string(products_list[index].description);
};
[/js]
In order to access this value, call “Update Products List” first.
[/creativ_toggle][creativ_toggle accordion=”1″ icon=”pencil” heading=”ProductId(index(integer))” onload=”closed”]
This expression returns the product id as string of the product at the passed index (0-based integer) from the product_list.
[js]
Exps.prototype.ProductId = function(ret, index) {
index = Math.floor(index);
if (index < 0 || index >= products_list.length) {
ret.set_string(“”);
return;
}
ret.set_string(products_list[index].productId);
};
[/js]
In order to access this value, call “Update Products List” first.
[/creativ_toggle][creativ_toggle accordion=”1″ icon=”pencil” heading=”ProductLocalizedPrice(index(integer))” onload=”closed”]
This expression returns the local price & currency as string of the product at the passed index (0-based integer) from the product_list.
[js]
Exps.prototype.ProductLocalizedPrice = function(ret, index) {
index = Math.floor(index);
if (index < 0 || index >= products_list.length) {
ret.set_string(“”);
return;
}
ret.set_string(products_list[index].localizedPrice);
};
[/js]
In order to access this value, call “Update Products List” first.
[/creativ_toggle][creativ_toggle accordion=”1″ icon=”pencil” heading=”ProductPrice(index(integer))” onload=”closed”]
This expression returns the default price & currency as string of the product at the passed index (0-based integer) from the product_list.
[js]
Exps.prototype.ProductPrice = function(ret, index) {
index = Math.floor(index);
if (index < 0 || index >= products_list.length) {
ret.set_string(“”);
return;
}
ret.set_string(products_list[index].price);
};
[/js]
In order to access this value, call “Update Products List” first.
[/creativ_toggle][creativ_toggle accordion=”1″ icon=”pencil” heading=”ProductStock(index(integer))” onload=”closed”]
This expression returns the stock as integer of the product at the passed index (0-based integer) from the product_list.
[js]
Exps.prototype.ProductStock = function(ret, productId) {
ret.set_int(this.storeService.stockOfProduct(productId));0
};
[/js]
In order to access this value, call “Update Products List” first.
[/creativ_toggle][creativ_toggle accordion=”1″ icon=”pencil” heading=”ProductTitle(index(integer))” onload=”closed”]
This expression returns the title as string of the product at the passed index (0-based integer) from the product_list.
[js]
Exps.prototype.ProductTitle = function(ret, index) {
index = Math.floor(index);
if (index < 0 || index >= products_list.length) {
ret.set_string(“”);
return;
}
ret.set_string(products_list[index].title);
};
[/js]
In order to access this value, call “Update Products List” first.
[/creativ_toggle][creativ_toggle accordion=”1″ icon=”pencil” heading=”PurchaseProductId” onload=”closed”]
This expression returns the ID of the purchased product. But note, you only have access to this expression if it’s used with the triggere “On purchase … completed“.
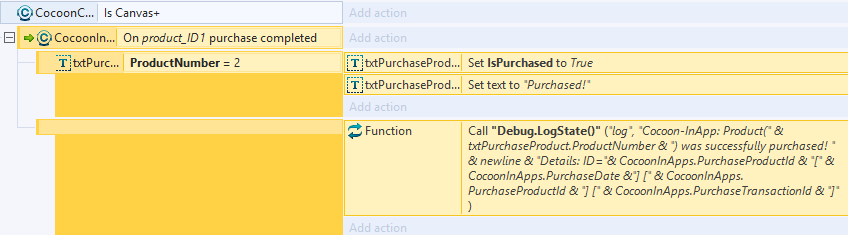
Used code to access the expressions:
[code]
“Cocoon-InApp: Product(” & txtPurchaseProduct.ProductNumber & “) was successfully purchased! ” & newline & “Details: ID=”& CocoonInApps.PurchaseProductId & “[” & CocoonInApps.PurchaseDate &”] [” & CocoonInApps.PurchaseProductId & “] [” & CocoonInApps.PurchaseTransactionId & “]”
[/code]
JavaScript Reference in the CocoonInApp plugin
[js]
Exps.prototype.PurchaseProductId = function(ret) {
ret.set_string(PurchaseProductId);
};
[/js]
[/creativ_toggle][creativ_toggle accordion=”1″ icon=”pencil” heading=”PurchaseProductId” onload=”closed”]
This expression returns the TransactionID of the purchased product. But note, you only have access to this expression if it’s used with the triggere “On purchase … completed“.
JavaScript Reference in the CocoonInApp plugin
[js]
Exps.prototype.PurchaseTransactionId = function(ret) {
ret.set_string(PurchaseTransactionId);
};
[/js]
[/creativ_toggle][creativ_toggle accordion=”1″ icon=”pencil” heading=”PurchaseDate” onload=”closed”]
This expression returns the date when the product was purchased as string. But note, you only have access to this expression if it’s used with the triggere “On purchase … completed“.
JavaScript Reference in the CocoonInApp plugin
[js]
Exps.prototype.PurchaseDate = function(ret) {
ret.set_string(PurchaseDate);
};
[/js]
[/creativ_toggle][creativ_toggle accordion=”1″ icon=”pencil” heading=”PurchaseQuantity” onload=”closed”]
This expression returns the quantity of the purchased product as integer. But note, you only have access to this expression if it’s used with the triggere “On purchase … completed“.
JavaScript Reference in the CocoonInApp plugin
[js]
Exps.prototype.PurchaseQuantity = function(ret) {
ret.set_int(PurchaseQuantity);
};
[/js]
[/creativ_toggle][/creativ_accordion]
Install the Plugin in the cloud compiler
[creativ_alertbox icon=”info-sign” colour=”blue” custom_colour=””]If you use the CocoonInApp Plugin in your Construct 2 game, please make sure that you also install the corresponding plugin in the Cloud Compiler under Cocoon.io – Your Project – Plugins! It’s called “In-App Purchases for Google Play”, “In-App Purchases for Amazon” or “In-App Purchases for iOS App Store” depending on the used store later.[/creativ_alertbox]
CocoonFacebook
In this part I’ll show you how to add and configure the CocoonFacebook plugin for construct 2. Firstly make sure that you have the latest plugin version installed. There was an update on the 15. January 2016. With this update the “Is user logged in” condition has been added by ludei.
Facebook Developer
In order to get your FACEBOOK_APP_ID and your FACEBOOK_CHANNEL you need to have a facebook developer account. Just visit the link below and sign in with your existing facebook account or greate a new one.
[creativ_button url=”https://developers.facebook.com/” icon=”beaker” label=”Facebook Developers” colour=”blue” colour_custom=”” size=”medium” edge=”straight” target=”_blank”]
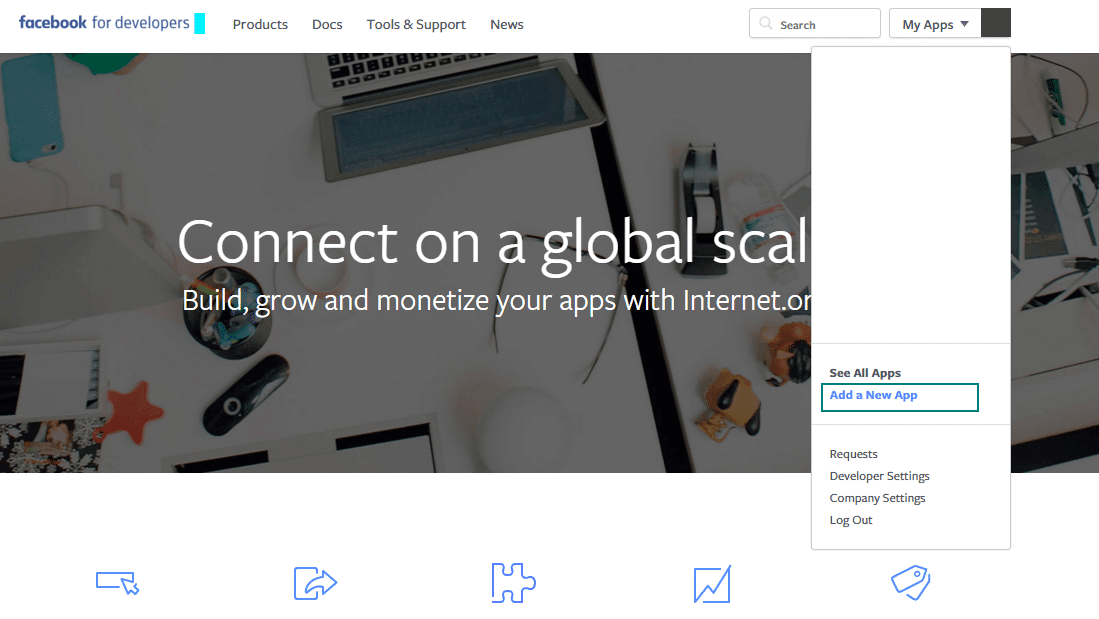
Once you’re logged in to your developer account, click on the My Apps button in the header menu and select Add a new App.
Then you’ll get ask on which platform your app depends. Choose Android for an android game and iOS for an iOS game.
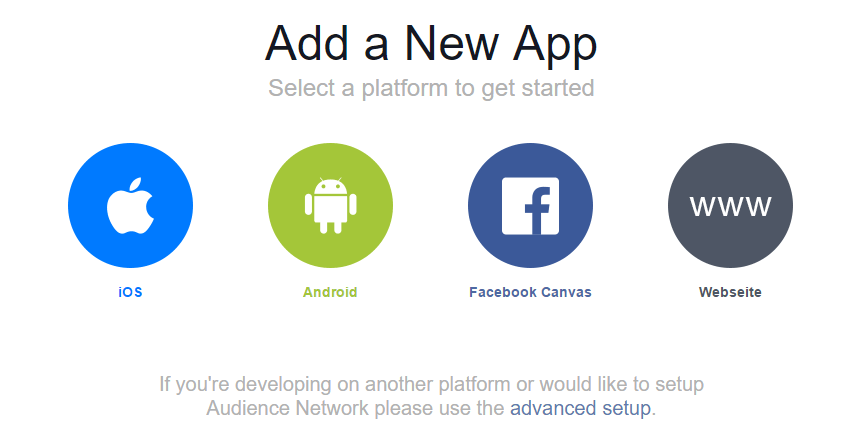
You can skip the Quick Start by clicking “Skip and create APP ID” in the upper right corner.
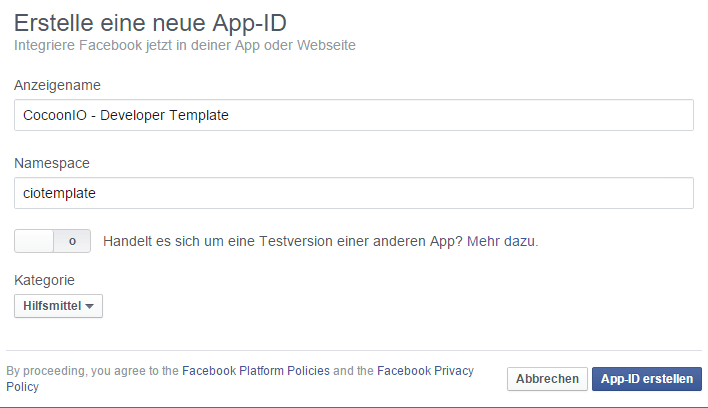
You can choose any name for your new app. The same applies to the namespace. Click on Create App-ID. Then you’ll redirected to your app propierties. Here you’ll find your APP_ID.
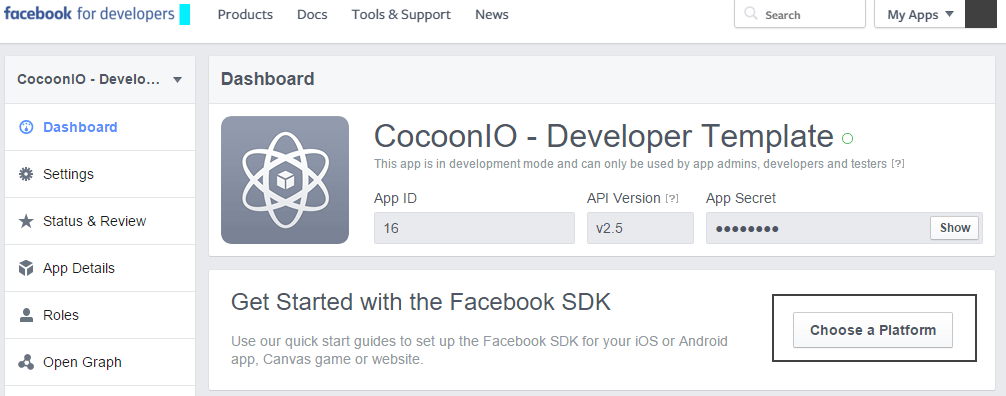
Copy this ID and insert it at your CocoonFacebook plugin field “Facebook APP ID“.
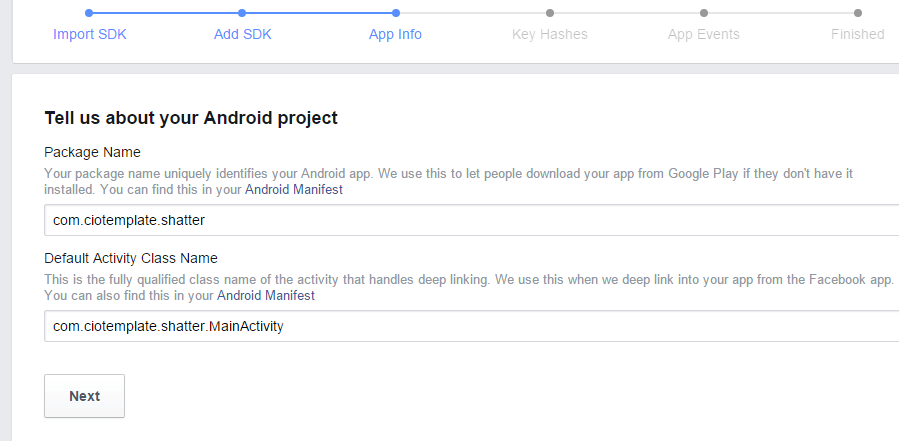
To proceed click on the Choose a Platform button, then select once again your platform. For this guide I select Android. Scroll then down till “Tell us about your Android project” and insert your bundle ID of your app and the bundle ID + MainActivity
Generate Hash Keys
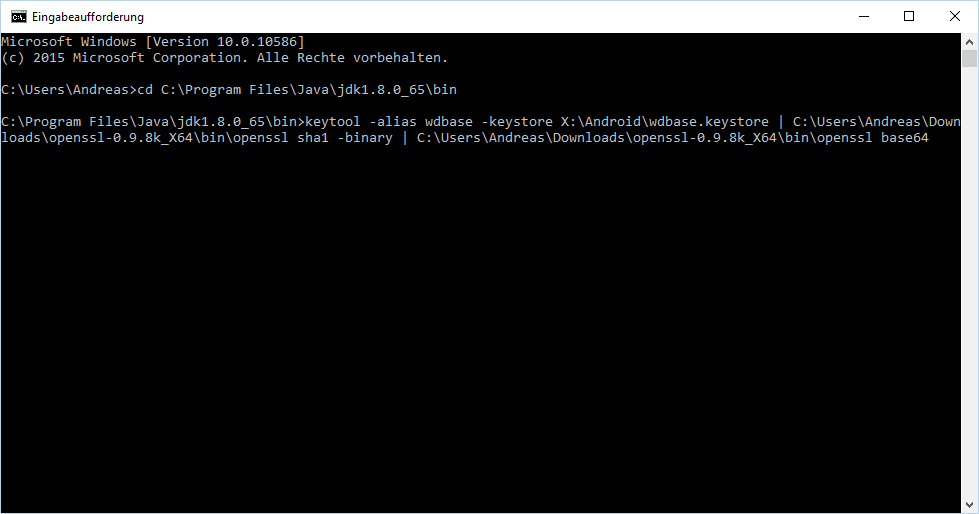
Now we need to generate a debug or a release hash key. In order to do this, make sure that you have installed JAVA JDK (If not, download it by clicking the button below).
Firstly you need to download the latest version of OpenSSL by clicking the download button below.
Then unzip it. We will need the path later. Mine is:
[code]C:\Users\Andreas\Downloads\openssl-0.9.8k_X64\bin[/code]
Open your CMD console and go to your Bin folder of your Java JDK installation. Mine is located at following path:
[code]C:\Program Files\Java\jdk1.8.0_65\bin[/code]
Now run following code (make sure that you replace the placeholders)
[creativ_alertbox icon=”info-sign” colour=”green” custom_colour=””]Note, you need to choose your keystore file which you have used for cocoon.io. If you don’t have a keystore file, you’ll find a tutorial showing you how to create one here:
How to create a Keystore file for Android
[/creativ_alertbox]
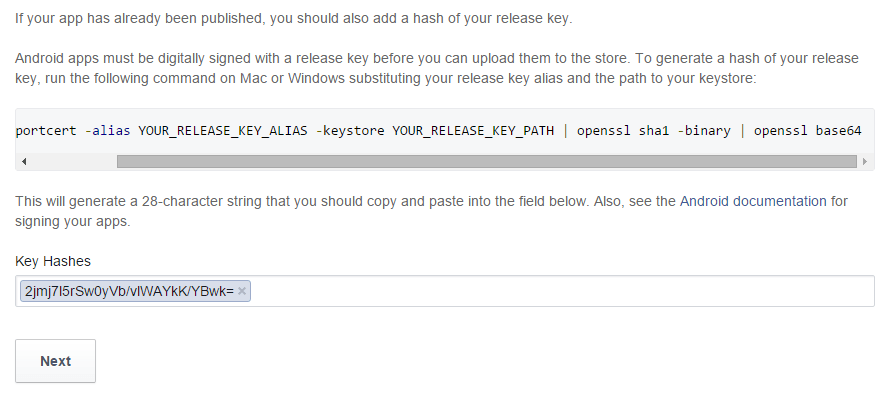
That’s the key you have to unter (replace the placeholders with your details).
[code]keytool -exportcert -alias YOUR_RELEASE_KEY_ALIAS -keystore YOUR_RELEASE_KEY_PATH | YOUR_OPENSSL_PATH\openssl sha1 -binary | YOUR_OPENSSL_PATH\openssl base64[/code]
On my end it looked like that:
Click enter if you are ready. If the process was successfully, you’ll get your Hash Key over here.

Copy this hash key into the field at the facebook developer page and then klick Next.
Note, at the moment your App is in testing mode, so it’s not live to all users, but for you it is. You can check this at the “Status & Review” tab.
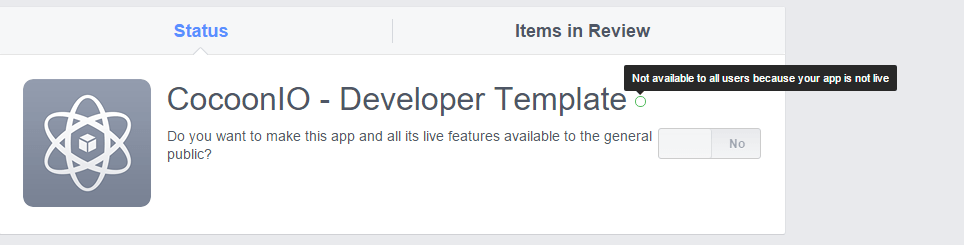
Here you are also able to set your app live when you feel ready to release it.
In order to set your app public add some Icons and Banner images at the “App Details” tab and then go to the Status & Review tab and click on the toggle button (see image below, in the blue rectangle).
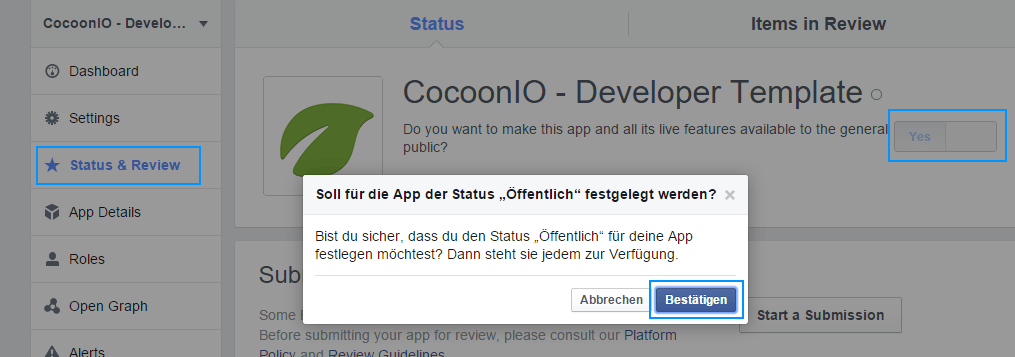
Confirm it and your app will be live.
CocoonIO – Install the Facebook Plugin
Go to your project and select “Plugins”. Then select the “Cocoon” tab and “Social” in the dropdown menu.
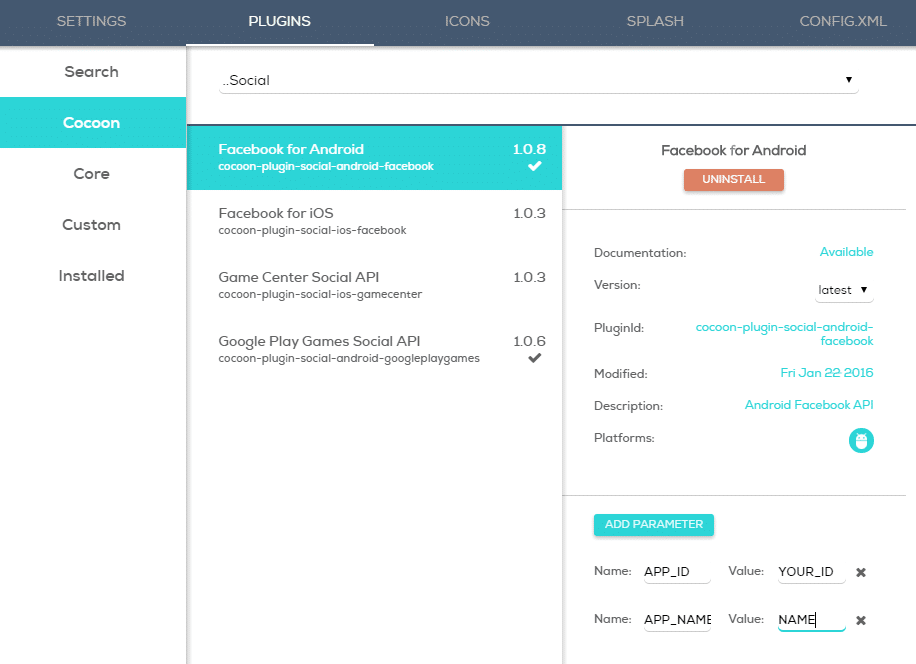
Then copy the APP_ID from the developer.facebook.com page and insert it here. Do the same with the APP_NAME. Please make sure that you insert following code snippet to your config.xml file when you are using the Facebook Plugin!
[code]<preference name=”android-minSdkVersion” value=”15″ />[/code]
You can learn more here.
[creativ_button url=”http://docs.cocoon.io/article/cocoon-facebook-plugin/” icon=”heart” label=”Docs – Facebook Plugin” colour=”blue” colour_custom=”” size=”medium” edge=”straight” target=”_blank”]
At the end your config.xml file should look like this.

Build your C2 Project
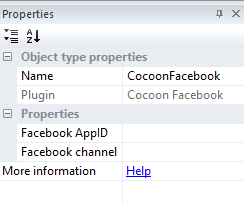
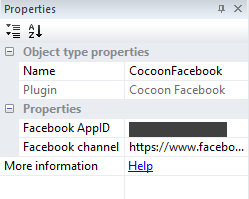
Once you’ve completed all steps above go to your C2 project and import the “CocoonFacebook” plugin to it. Then select the plugin in the project bar and enter your APP_ID and your CHANNEL LINK.
Then code your function. You can download our free CocoonIO Developer Template to see how it works. When you feel ready export your game via Cordova and delete the config.xml file and the “…additional.xml” file (if existing). Don’t forget that! Otherwise you’ll overwrite the config.xml file from the cocoonio compiler!
Build your app, download and install it.
Troubleshooting
[creativ_accordion][creativ_toggle accordion=”1″ icon=”” heading=”Invalid key hash” onload=”closed”]
If you get an error with your key hash, just add the key from the error message to your app at developer.facebook.com.
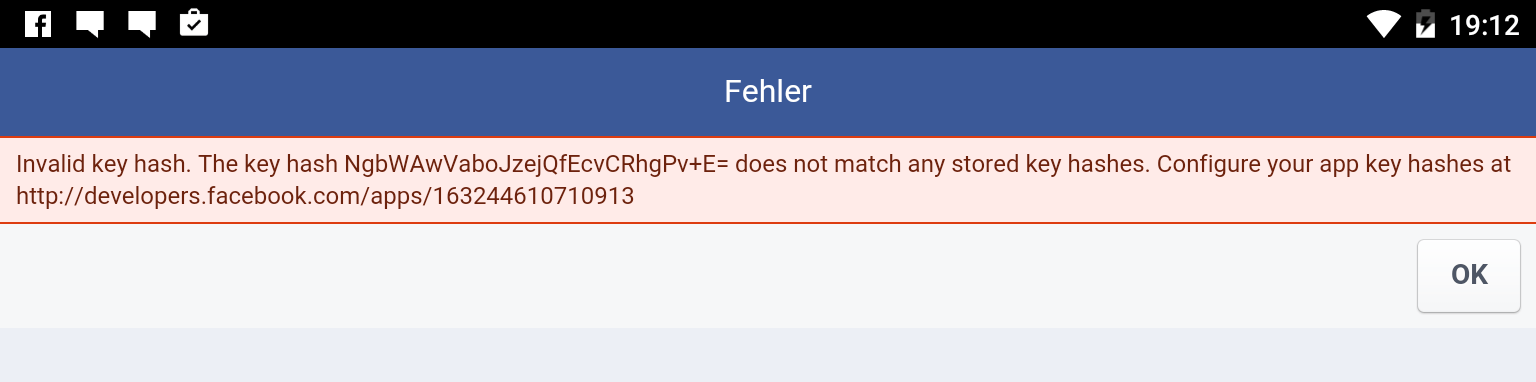
Like shown here.

[/creativ_toggle][creativ_toggle accordion=”1″ icon=”warning-sign” heading=”…” onload=”closed”]
Free for further troubleshootings.
[/creativ_toggle][/creativ_accordion]
CocoonCanvasPlus
In order to use the actoins and events of the Canvas+ you must install and import the CocoonCanvasPlus Plugin for C2 by ludei first.
[creativ_accordion][creativ_toggle accordion=”1″ icon=”reply” heading=”Exit App” onload=”closed”]
The CanvasPlus plugin offers a way to close the app (but without a dialog. You can create an exit function like this.
The Browser Plugin
Please import the offical browser plugin from Construct 2 into your Project. Then create following code.

We also used an additional exit button for this example. So you can either call the exit by the “On Browser Back Button” or on the sprite “btnExit”.
You also find that code in our Cocoon Developer Template, which is available for free over here.
[creativ_button url=”https://shatter-box.com/downloads/cocoonio-developer-template-construct-2/” icon=”” label=”CocoonIO Developer Template” colour=”green” colour_custom=”” size=”medium” edge=”straight” target=”_blank”]
[/creativ_toggle][creativ_toggle accordion=”1″ icon=”question-sign” heading=”is Canvas+” onload=”closed”]
This condition is true when the game runs on a cocoonio-built Android or iOS App. Add this condition whenever you are use actions and conditions provided by the Cocoon plugins. Otherwise you’ll get a JavaScript Error in the browser preview.
[/creativ_toggle][creativ_toggle accordion=”1″ icon=”pencil” heading=”Dialogs and Inputs” onload=”closed”]
The CanvasPlus plugin also offers a way to interact with the player by opening an inputfield or a dialog window. You can use the dialog window for an exit message for instance (see first tab).
[/creativ_toggle][/creativ_accordion]
Publish
If you feel ready to publish your game, just follow the steps below. We guide you through the complete process.
Android
In order to hold it organized, I decided to make an extra page for this guide, so please find it here:
[creativ_button url=”https://goo.gl/O5xdQb” icon=”book” label=”How to publish your Android game to Google Play” colour=”blue” colour_custom=”” size=”medium” edge=”rounded” target=”_blank”]
iOS
In order to hold it organized, I decided to make an extra page for this guide, so please find it here:
[creativ_button url=”https://goo.gl/ghzbwV” icon=”book” label=”How to publish your iOS game to iTunes” colour=”blue” colour_custom=”” size=”medium” edge=”rounded” target=”_blank”]
Privacy Policy
Also apps do need a Privacy Policy, and it’s not enough to link the one used for your website. I’m using Iubenda in order to create my policies.
[creativ_button url=”http://iubenda.refr.cc/CXKRKK2″ icon=”heart” label=”Generate your Privacy Policy” colour=”blue” colour_custom=”” size=”medium” edge=”rounded” target=”_blank”]
Benifits
- Optimized for games and apps
- Available in nearly all languages
- Easy to use
You can find an example here.
hi nice tutorial here,
i just want to know the possibilites of construct 2
is it capable to use analytics plugin ?
i nee to use facebook event api, and google analytics for measure install location
Thank You
Hi,
You can add every feature to construct as Plugin / Behavior.
I know that there is already a plugin for Google Analytics, but not for the Facebook Event API.
If you know JavaScript, you can code a plugin on your own. If not, you can request it in the
Scirra forum.
But basically it’s possible with c2.
The leaderboard doesn’t work. It tries to login but nothing happens. I tried everything. Can you please help?
Have you setup your play service completely? You musst assign an apk file to your play service. Then ensure that your test apk has the same bundle ID then the associated one.
If you need further help, please visit our forum here.
https://shatter-box.com/forums
Yes, I did! And it even starts to login but then it closes the login screen and nothing happens. I tried to export as Webview+, as Canvas+….everything. I am using CocoonGooglePlayGames plugin in C2.
Does Coccon.io in app purchases also work for iOS as well as Google Play?
Yes it does 😉 Just use the same InApp ID’s on both platforms.
Hi
Facebook Plugin. What is that CHANNEL LINK. in cocoonPlugin in C2. Is that created application pages to facebook or what?
Why those plugin installed in cocoon are so huge. They are bigger than my app. Its 100 mb, is it ok with that?
Hi Martin,
That‘s not normal. I did install all plugins by cocoon and my app has a download size of about 15 MB. Can you check it again?
Regards
Andy
Thanks it’s true 😉
Stil I have problem with this button share. Nothing happend when I click it ;-(
Now i See info here “Add the ‘Cocoon CanvasPlus’ plugin to your project (you must have installed the AtomicPlugins by ludei).”
Ok I have Cocoon CanvasPlus but I can’t find newest AtomicPlugins by ludei. Maybe this is cousing button problem. I can’t click it.
thanks for ur awesome tut. I have a question. Can u pls tell why do we choose Cordova as exporter why not CocoonJs? Whats the difference and which one do u recommend while exporting for android
Hi Sam,
thank you very much! I‘m glad that my guide was helpful for you.
CocoonJS is an older cloud compiler by ludei. Since CocoonIO was released, ludei is using Cordova for it‘s compiler. This allows to install all cordova plugins to your project.
Regards
Andy
Hi! You say: “If you want to compile to canvas+ (what I recommend) you must replace all ‘Browser’ functions like ‘Close Browser’ with the events and actions provided by the new Atomic Plugin ‘CocoonCanvasplus’.”
However, I had an issue with my game on Android in that it would close the game if I accidentally touched the back button on my phone, so I added in a bit of code using the browser plugin that vibrates the phone if you touch the back button (Overrides the closing). I note that this action isn’t available with the CanvasPlus. Do I need to replace all functions or just those that are included in this new plugin?
Hi Andy,
thanks for your comment. I never had the issue that the game closes when touching the back button of my device. The guide isn’t 100% clear about this, I have to admit.
Not all browser functions need to be replaced. Only the one for closing and for opening any URLs.
So “On back button” does work on Canvas+ and WebView+. As you already have thought, you only need to replace the browser function which are included in the “CocoonCanvasPlus” plugin.
I’ll update the guide to make this sure! Thanks for the input.
Regards
Andy
i have some wrong when i upload my game to ( ios and android ) with cocoon
i need solution to solve it.
look image below.
1- iOS : https://b.top4top.net/p_768kmk241.jpg
2- Android : https://c.top4top.net/p_768n6nyi2.jpg