About
This guide shows you how to setup inapp products in Construct 2. Basically the inapp products are separated in two categories, “one time buy” and “unlimit buy”. Howover Google Play now only offers “Managed Products” which can be purchased only once. In this case the purchase must be consumed afterwards.
C2 Plugin
I’m using the free CocoonInApp plugin by Ludei. This plugin, however, only works if you build your game with Cocoon (see a guide here). If you don’t want to use Cocoon as compiler, you need to use either the CordovaIAP plugin by Cranberrygame or the IAP plugin coming along with Construct 2.
InApp Products
Product ID
The product ID will be used to identify your product later at Google Play / iTunes. The ID basically can be what ever you like. I personally build it like shown below:
[code]APPNAME.PRODUCT[/code]
For instance, the “Remove Ads” product for my game Fluffy Bounce would be:
[code]fluffybounce.removeads[/code]
We will show you later how to setup the products at Google Play / iTunes. First we are going to create the Construct 2 part.
General
We start with the general setup of products which should be purchased only once. This applies to, for instance, a product which removes the ads from your game. Make sure that you have installed and added the CocoonInApp plugin to your project.
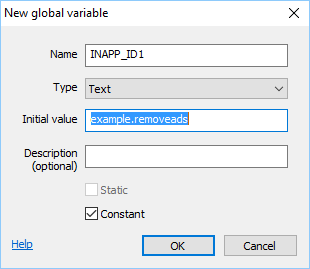
First add a new global varibale called “INAPP_ID1” to your construct 2 project. This ID will store your product ID later. You see the setup below.
In order to purchase this item later, we need to fetch it from the store first. This should be done on start of the layout (once per game session is fine). So add a new event “System -> On start of layout” and “System -> Is on platform Cordova“. To this event add the action “CocoonInapp -> Fetch products from store -> “INAPP_ID1“.

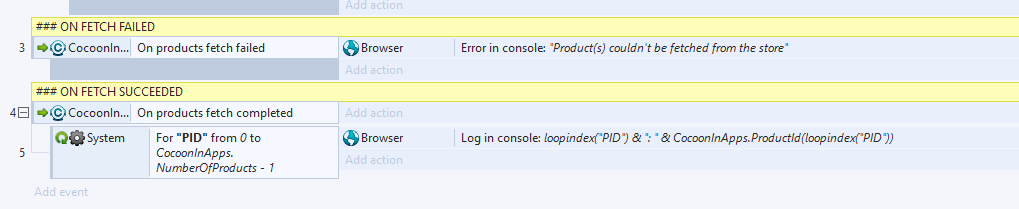
If all went fine, the event “CocoonInApps -> On products fetch completed” gets triggered. Here you can list all fetched products. An example is shown below.
Purchase triggeres
Now we can add so called purchase triggeres. This can be sprites needed to be touched to call an inapp purchase. This also can be a button, however then you cannot build with Canvas+ anymore. WebView+ works fine though.

So when the player touches the sprite, a purchase will be called.
If the purchase was successfully completed, the event “On purchase [ID] completed” gets triggered. Here you can put your code which should be executed after the purchase, for instance, removing the ads.

That it is for non-consumable products. Those products only can be purchased once and are able to be restored with the “Restore purchase” action. However this is inappropriate for items like coin packages. Such items should be available for purchase more than once.
Consumables
In this case, you must consume the purchase right after the purchase had completed. You find an example shown below.

This will allow the player to purchase the item again and again. Those items cannot be restored with the “Restore purchase” action.
Google Play
Please see here.
iTunes
Please see here.
Download CAPX
Please find the example file attached here.