Get Started
You bought our Modular Game Template and now what? Here I going to explain you how to get started. If you already have experiences with Construct you can skip this of course.
Construct 2
Our template is a good opportunity to start wortking with Construct 2. But what actually is Construct? Well Construct 2 is an awesome game-building tool making it easy and possible for everybody to make his/her own games. The best is, you don’t need to write one line of code. Awesome, isn’t it?
[creativ_button url=”https://scirra.com” icon=”heart” label=”Scirra” colour=”green” colour_custom=”” size=”medium” edge=”straight” target=”_blank”]
If you are completely new to Construct you are here at the right place. I will demonstrate you all steps to successfully use our Modular Game Template and to build your awesome game.
Download the latest Version
Generally we are using the latest stable version of Construct 2. If you get an error message that you are using an old version, please visit this link and download the latest version of construct. Otherwise you cannot open newer projects.
[creativ_button url=”http://www.scirra.com/construct2/releases/new” icon=”heart” label=”Download latest stable Version” colour=”green” colour_custom=”” size=”medium” edge=”straight” target=”_blank”]
It’s not recommended to use the beta version for production or your projects.
Install plugins
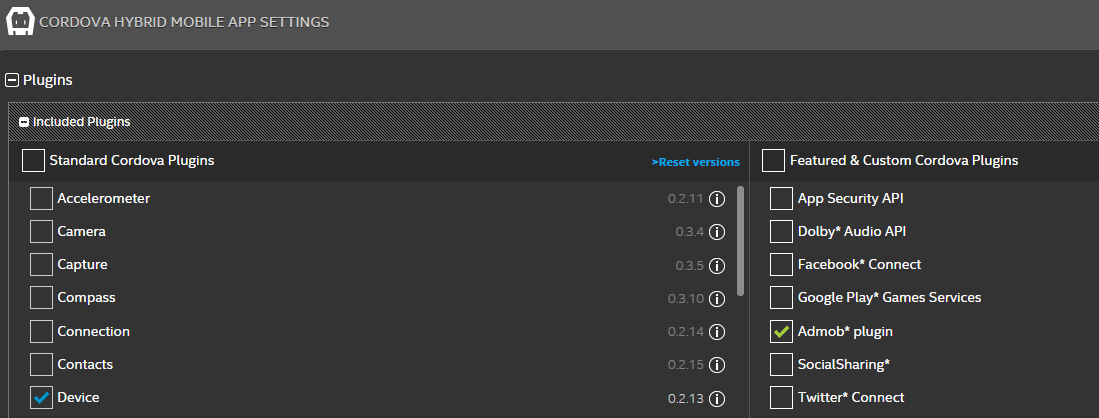
Often you will find additional plugins in our package, like here. In the case that we used additional plugins you have to install them first in order to open the project file.
Unpack the plugin archive located in the folder Plugins and you’ll find some diffrent files (for example see the screen shot below, your plugin files can look diffrently).

Go to your installation folder of construct 2 and visit ‘\Construct 2\exporters\html5\plugins’. Create a new folder and name it like your plugin, for example ‘PhonegapPowermanagement’ and copy the the unpacked content into this folder.
- common.js
- edittime.js
- PluginIcon.ico
- runtime.js
Then start Construct 2 and the installed plugin will be available for use.

Open the Project
The Construct 2 Project file (.capx) is located in the Source folder. If you have installed all needed plugins you can open it by a simple double-click on the .capx file. If you get any errors please check if you have installed the latest version (at least r212.2) and if you have installed all needed plugins listed below:
- Phonegap Analytics
- Cordova Game
- Cordova InGame
If you still get any errors, please let us know by opening a new topic in our support forum.
[creativ_button url=”https://shatter-box.com/forums/forum/23-game-templates/” icon=”cog” label=”Get Support” colour=”theme” colour_custom=”” size=”large” edge=”straight” target=”_blank”]
Game Moduls
- Sick of starting from scratch with Construct 2?
- Sick of struggling with basic function taking too much time to implement?
Then take a look at our new Modular Game Template (MGT) available exclusive in the Scirra Store! It never has been easier to start a new game from scratch! With our ‘Module Game Template’ you can easily switch moduls on or off without changing the code.
The configuration file

The Template comes along with a configuration event sheet called “es_config”. This file allows you to easily switch moduls on or off.
You fill find the description for all modules below.
Live Demo
Here you can start the demo, but note that the modules for Analytics, Ads and Leaderboard are only working if the game has been compiled with Intel XDK.
[creativ_button url=”https://www.scirra.com/arcade/tutorial-games/modular-game-template-7715″ icon=”play” label=”Play the Demo (Scirra Arcade)” colour=”theme” colour_custom=”” size=”medium” edge=”rounded” target=”_blank”]
Features
Don’t waste your time with coding basic functions anymore! Check out the benifits using our new Modular Game Template!
- Complete Saving & Loading function using the LocalStorage Plugin
- Many modules are included and ready to be used (list can be found below)
Available Moduels
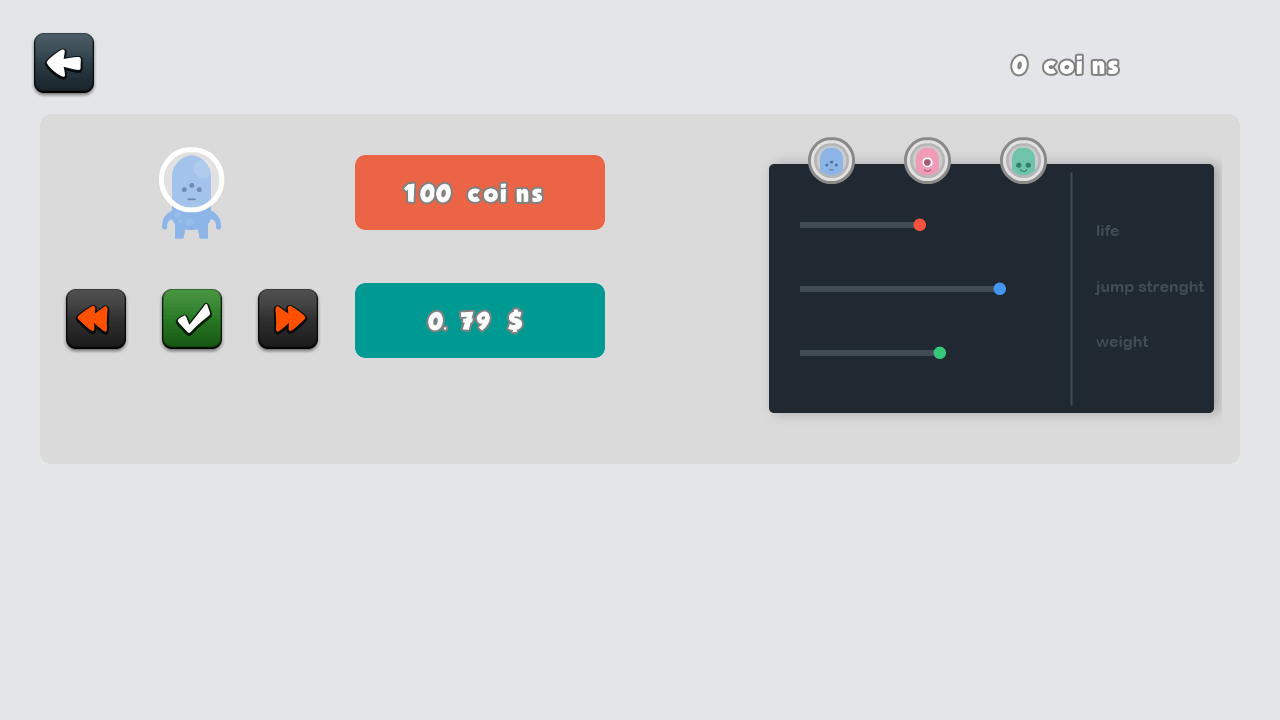
Player Selection
The game offers the ability to use more than one player. Moreover you can earn money with InApp Purchase by making some avatars only available for money or in-game coins. Our moduls offers both!
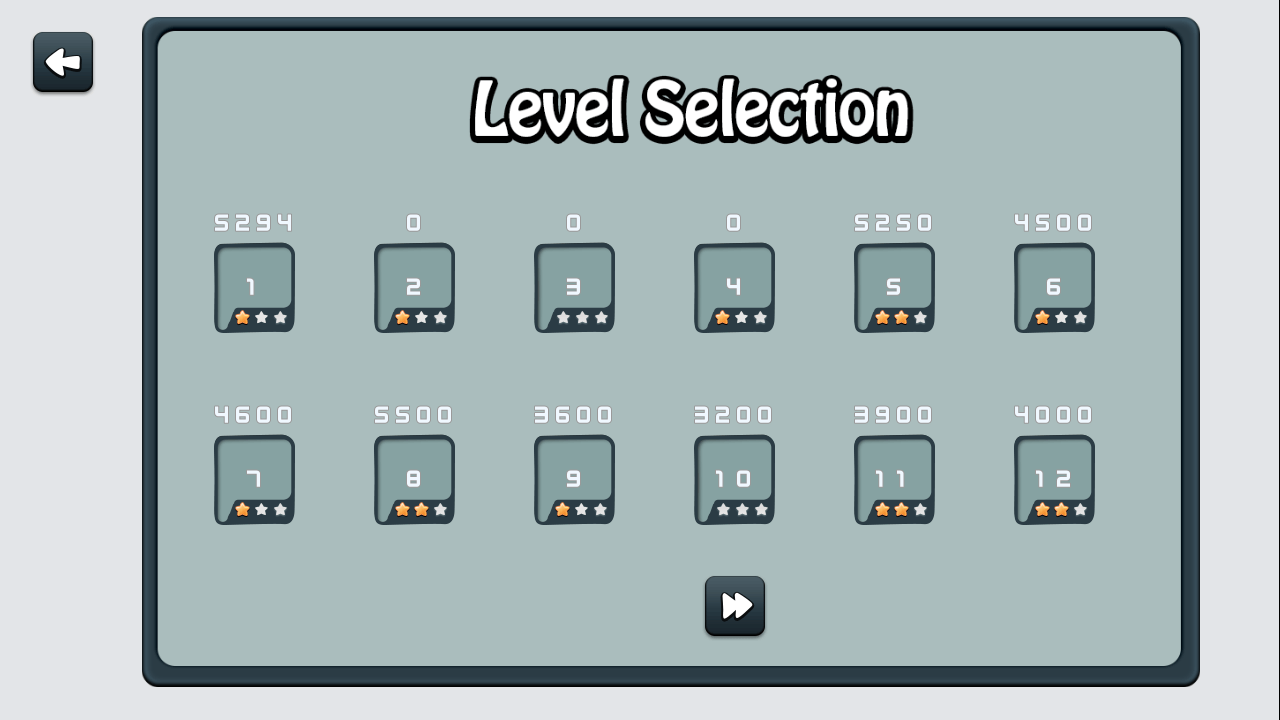
Level Selection
Also you have the opportunity to enable a level selection with just one click! Then your players can explore more than just one level!
Checkpoint Sysetm
The game includes also a Checkpoint System. This allows the player to respawn at a earlier set flag. So he/she doesn’t have to start from the beginning. Also this module can be toggled on or off with just one click. Awesome, isn’t it?
AdMob Ads
Start earning money with your game! The only thing you have to do is to enable the AdMob Ads module and enter your ID’s. It never has been easier right?
Google Analytics
Keep an eye on your players behavior. Our Google Analytics Module allows you to track every event & screen by just calling a function with the parameters you want to track. The only thing you have to do is to enable the module and add your ID.
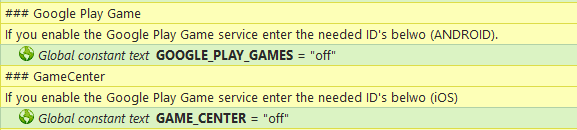
Leaderboard
Encourage your players to beat the highscore from other players all over the world. In order to do this you need a online Leaderboard. The best choice for Android is Google Play Games Service and for iOS the GameCenter. Thanks to cranberrygame and his plugin Cordova Game this is possible! Just enable the modules and add your ID’s, done!
Documenation
You find the documentation for each module below. If you need support please use our support forum here.
[creativ_button url=”https://shatter-box.com/forums/forum/23-game-templates/” icon=”comments” label=”Support Forum” colour=”blue” colour_custom=”” size=”medium” edge=”rounded” target=”_blank”]
Player Selection
The project template has a Player Selection Module included allowing you to add more than 1 player skin. The Selection bases on our Game Template – Player Select.
You find the docs about it here.
[creativ_button url=”https://shatter-box.com/?p=13070″ icon=”book” label=”Player Selection” colour=”green” colour_custom=”” size=”medium” edge=”straight” target=”_blank”]
Enable the module
By default the module is set to “on”. Please check the ‘es_config’ event sheet. Set the service you want to use to “on”.

When the modul is active the player will be redirected to the Player Selection screen, if not, the player jumps directly to the Level Selection screen (if on) or to the game (if off).
Level Selection
The project template has a Level Selection Module included allowing you to add more than 1 player skin. The Selection bases on our Game Template – Level Selection.
Enable the module
(Only for the “Modular Game Template”)
By default the module is set to “on”. Please check the ‘es_config’ event sheet. Set the service you want to use to “on”.

When the modul is active the player will be redirected to the to a Level Selection screen before he enters the game.
Adjust available Worlds and Levels
The available worlds and levels is controlled by the ‘levels’ array. This array can be found at Arrays in the project bar. Mark it to open the properties.

- Width: Number of available levels
- Height: Number of available worlds
- Depth: not used
The total amount of levels will be calculated width * height (equals available levels * available worlds).
Each levels button has an instance variable called ‘level’. This identify its level (Note, this index is 0-based!). For example, if the instance variable level = 3 it will jump to level called ‘level4’. Keep that in mind.

So if you reduce the available levels you must delete the last level buttons till you’ve reached the wished amount. Otherwise you must copy an existing element and adjust its level ID.
Add more Level Layouts
If you use the LevelSelection you need to create a new layout for each level (worlds * available levels). By default the first level is included & called ‘level1’. This layout can be found in the project bar under Worlds/#1.

You can just clone the layout by performing a right-mouse click on it and selecting ‘Duplicate’. Then rename the level to ‘levelX’ (X equals the current level number, for example ‘level2’ for level 2.)
This is an example how it should looks like.

A live demo can be found in the Scirra Arcade.
[creativ_button url=”https://www.scirra.com/arcade/shooting-games/angry-aliens-751″ icon=”play” label=”Angry Aliens” colour=”dark-gray” colour_custom=”” size=”medium” edge=”rounded” target=”_blank”]
Leaderboards
The project template is ready for Google Play Games & GameCenter service using the Cordova Game Plugin by Cranberygame (plugin is included).
Enable the modules
By default both services are set to “on”. Please check the ‘es_config’ event sheet. Set the service you want to use to “on” (or both, don’t work with CocoonIO up to now).
Add your ID’s
If you scroll down the ‘es_config’ event sheet you will find a lot of variables for various ID’s.
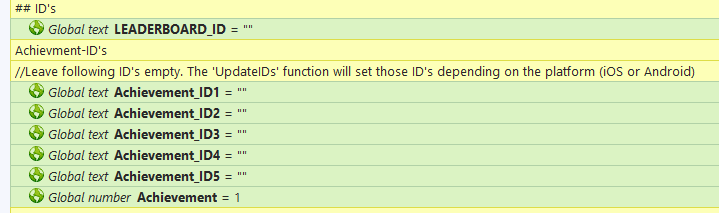
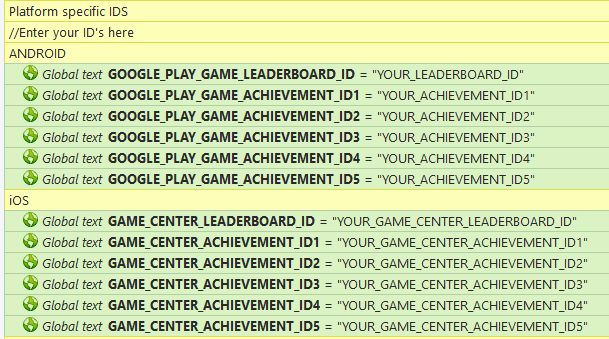
This is the place where you need to add your ID’s. Up to know it’s fine if you only add the LEADERBOARD_ID for the used services. There is no achievement function included yet.
Functions
To ease the use of the leaderboard service the project template comes along with functions. So you easily can call a function to achieve what you need, for instance, submit the score to the leaderboard.
All functions for the leaderboard are located in the ‘es_googleplaygames’ event sheet.
GPGUpdateIDs
This function will fetch the needed ID’s depending on the current platform (Android or iOS). Call this function before you call all other functions. Otherwise the ID variables are empty. The function has no additional parameters..
GPGLogin
This function can be called to login or logout the player from the Leaderboard.
[js]Function.Param(0) = login / logout[/js]
GPGSubmitHighScore
Call this function if you want to submit the current highscore to the leaderboard. The player must be logged in.
[js]Function.Param(0) = Score to be submitted (integer or float)[/js]
AdMob
The project template is ready for Admob Ads using the AdMob Plugin by Scirra (plugin is automatically included in C2).
Enable the module
By default the service is set to “on”. Please check the ‘es_config’ event sheet. Set the service you want to use to “on”.

If ADMOB_ADS are “on” you can individually set the fullscreen & banner ads “on” or “off”.
Add your ID’s
In order to add your ID’s to the template search for the AdMob Plugin in the project bar (right side) and mark it. Then the properties for this plugin will be opened on the left side.
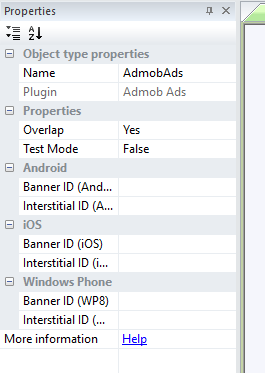
Add all your needed ID’s here.
[creativ_button url=”https://shatter-box.com/?p=3839″ icon=”book” label=”AdMob Banner & Fullscreen Ads” colour=”green” colour_custom=”” size=”medium” edge=”rounded” target=”_blank”]
Ads Function
To ease the use of the AdMob Ads service the project template comes along with functions. So you easily can call a function to achieve what you need, for instance, preload the ads in the background or call a fullscreen ad.
All functions for the AdMob Ads are located in the ‘es_ads’ event sheet.
AdsPreload
This function will preload the choosen ad format in the background. This is recommended to be called on the start of the layout where the ads should be shwon later.
[js]Function.Param(0) = banner / fullscreen //Preloads banner or/and Fullscreen ad[/js]
AdsShowBannerAd
This function can be called to show a banner ad (banner ad should be preloaded befor you call this function. In the template this function will be called when ‘On banner ad loaded’ condition is ‘true’).
[js]No additional parameters are used for this function.[/js]
AdsShowFullscreen
This function can be called to show a fullscreen ad (fullscreen ad should be preloaded befor you call this function. In the template this function a variable called ‘ad_counter’ is used. This variable counts down from 3 to 0 (-1 each time the function is called). If the ‘ad_counter’ variable has reached 0 the fullscreen and will be triggered and the ‘ad_counter’ will be set back to 3.).
[js]No additional parameters are used for this function.[/js]
Analytics
The project template is ready to track actions and screens using the Phonegap Google Analytics Plugin by cranberrygame (inclueded in the package). Please install the plugin before you open the project file. Otherwise you’ll get an error about the missing plugin files..
Enable the module
By default the service is set to “on”. Please check the ‘es_config’ event sheet. Set the service you want to use to “on”.

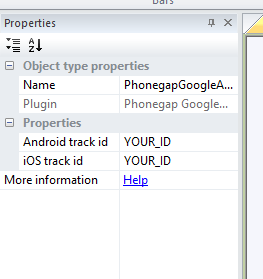
Add your ID
If you enable the Google Analytics module you must enter your Tracking ID. In order to do this select the PhonegapGoogleAnalytics plugin in the project bar to open its properties. Then add your ID in the needed field.
Visit Google Analyitcs to create a new ID if you don’t have one.
[creativ_button url=”https://www.google.com/analytics/web” icon=”user” label=”Google Analytics Dashboard” colour=”orange” colour_custom=”” size=”medium” edge=”rounded” target=”_blank”]
Analytics Function
To ease the use of the Google Analytic Tracking the project template comes along with functions. So you easily can call a function to achieve what you need, for instance, track a certain action.
All functions for Google Analytics are located in the ‘es_analytics’ event sheet.
GoogleAnalyticsTrack
This function can be called to track a certain event. For example:
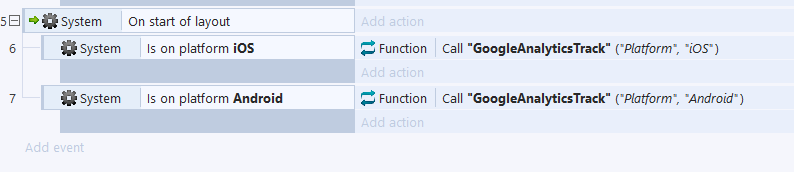
This function will either send “iOS” or “Android” to the category “Platform”. The result will be like:

[js]Function.Param(0) = The category for the event
Function.Param(1) = The action that will be tracked[/js]
GoogleAnalyticsTrackScreen
This function works like the one above, but instead of tracking an event you can track the current screen.
[js]Function.Param(0) = Screen name[/js]
Intel XDK
Please note that Intel XDK has been deprecated! See the statement of Intel below,
Read the full statement here.
https://software.intel.com/en-us/xdk
The game template is optimized to work with Cordova and Intel XDK. For all other platforms like CocoonIO you may alter the code and replace the plugins with the Atomic Plugins.
You find a tutorial how to build with Intel XDK here.
Add the needed plugins
CocoonIO