![]()
About
This game template includes a complete inventory system. The players are able to purchase items with in-game currency (coins). Depending on how you want to handle it, the player either can earn coins for playing or by buying them with real money. At the moment the template is optimized for Cocoon. All needed free plugins are included.
If you need any help with your template, please visit our support forum here.
[creativ_button url=”https://goo.gl/VF8n5e” icon=”cog” label=”Support” colour=”blue” colour_custom=”” size=”medium” edge=”straight” target=”_blank”]
Features
- Built in HD 1280×800 px
- AdMob Ads with a “Remove Ads” InApp Purchase
- Google Analytics
- InApp Purchases / InGame currency
- Works for Android and iOS (no changes needed)
- Expandable Inventory
- LocalStorage
- Clean and well commented code
- Localized
Screenshots


Documentation
Desktop and Mobile
Those functions are available for all platforms.
Inventory Size
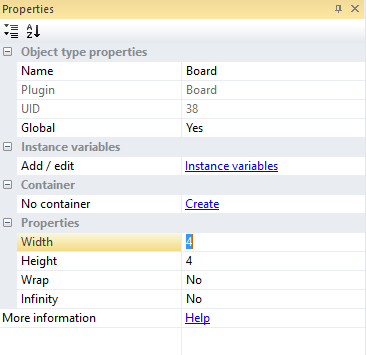
The Inventory will spawn then Height * Width items with a badge and an inventory counter (the amount of the item in stock). For default the inventory can hold 16 items, with corresponds the Height = 4 and the Width = 4. You can adjust this to fit your need.
Inventory Position
By default the Inventory will be always centered in the window. If you want do adjust this, you need to alter the marked line.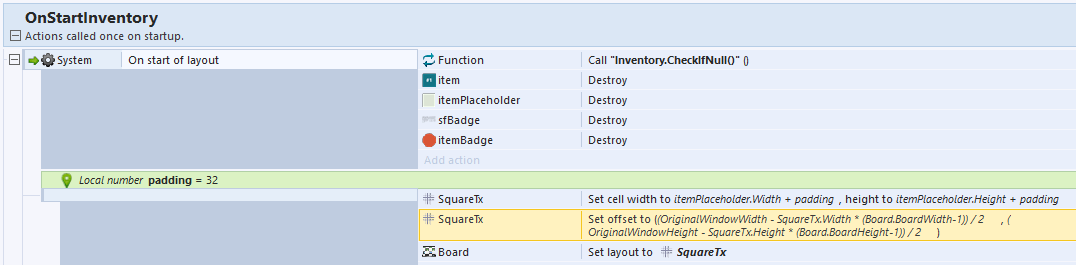
This code can be found in the “es_inventory” event sheet at the group “OnStartInventory“.
Set and Get
You either can increase the item count of an item (for instance if the player buys a new item) or decrease it, if the player used one item in the game. For this there is a function available.
This function can be called if you want to manipulate the data in your inventory.
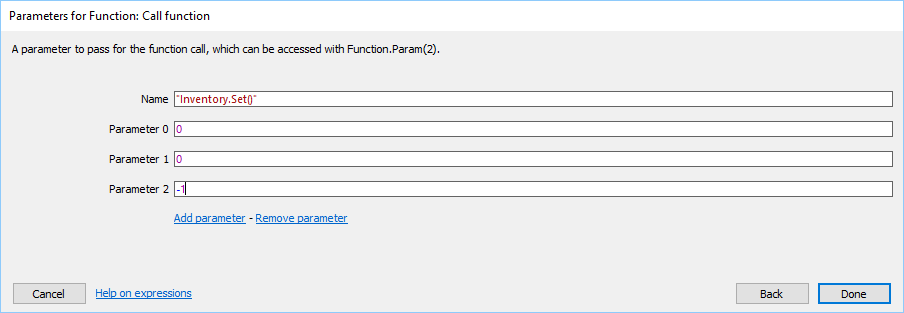
[code]”Inventory: Value at ” & Function.Param(0) & ” / ” & Function.Param(1) & ” set ” & Function.Param(2)[/code]
Example 1)
If you want to increase the amount of an specific item by 1, make following call.

This function call will set the item on Width = 4 and Height = 4 to curValue + 1
Example 2)
If you want to decrease an item count, call following function.
This function call will set the item on Width = 0 and Height = 0 to curValue – 1
The inventory will be saved on each function call automatically, so as the badges get updated automatically. So you only need to use the “Inventory.Set()” function call in order to manipulate the item amounts.
Localisation
The template uses our “Game Template – Localisation”. Please see the corresponding documentation here.
[creativ_button url=”https://shatter-box.com/knowledgebase/cross-platform-game-template/#localisation” icon=”book” label=”Localisation – Documentation” colour=”blue” colour_custom=”” size=”medium” edge=”rounded” target=”_blank”]
Mobile Only
Following functions are only available if you built your game with CocoonIO. Please see a complete guide here.
[creativ_button url=”https://shatter-box.com/knowledgebase/cocoonio/” icon=”book” label=”Construct 2 – How to build with CocoonIO” colour=”blue” colour_custom=”” size=”medium” edge=”rounded” target=”_blank”]
Google Analytics
In order to track data you must enter a valid Google Analytics ID. Just select the “CordovaGoogleAnalytics” plugin in your project bar and enter your ID’s.

The game tracks automatically the current screen (layout) and some default events, like when an item was purchased and so on. If you want to track an own event / screen, you just need to call following functions.
[code]”Google Analytics: Screen ” & Function.Param(0)[/code]

This function call will always track the current layout name (when the layout changes). This call is already included in the “es_global” event sheet at the group “OnStartGlobal”.
[code]”Google Analytics: Event ” & Function.Param(0) & ” (” & Function.Param(1) & “)”[/code]
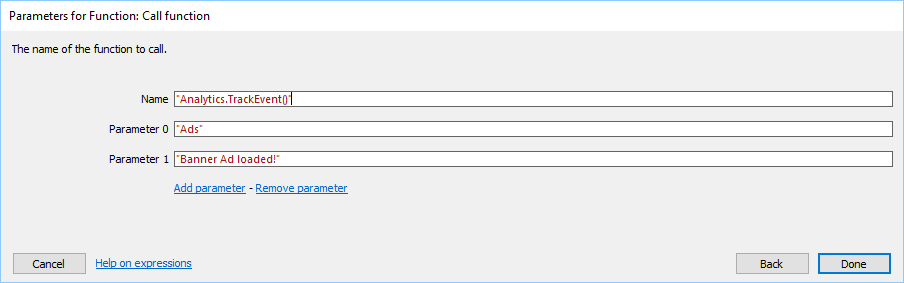
This function will track a new event “Banner Ad loaded!” in the category “Ads”.
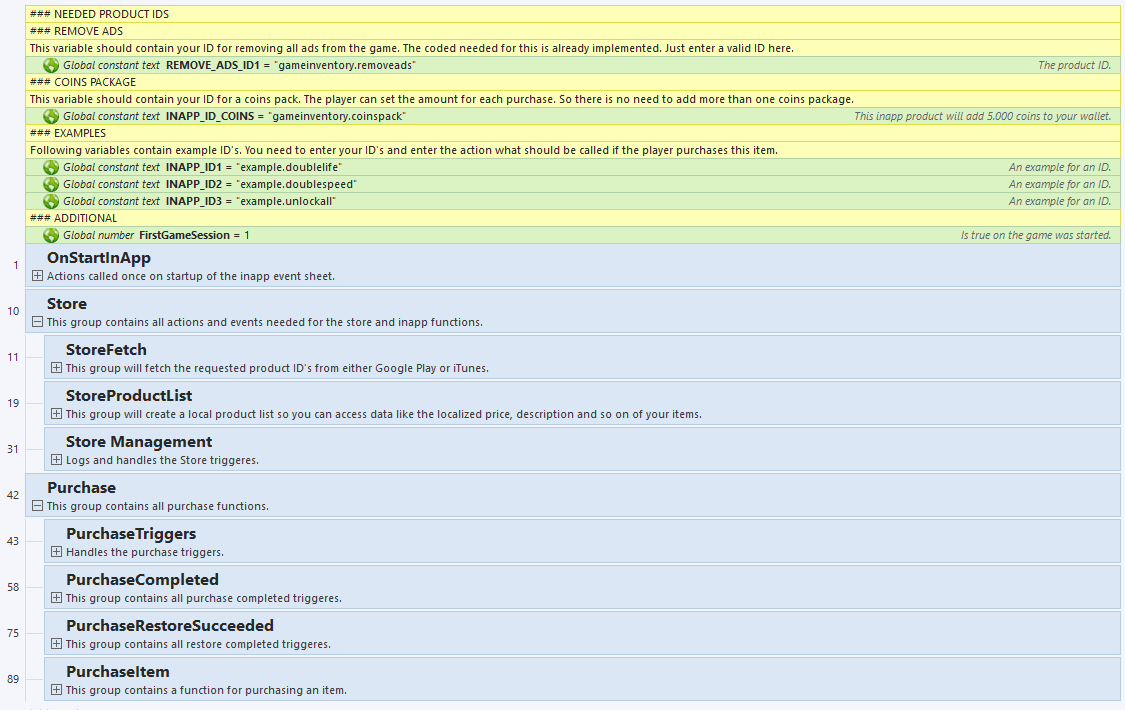
InApp Purchases
The template allows the player to purchase ingame products, like the “Remove Ads” or a “Coins Pack”. Latter is a consumable item, which means that this item can be purchases more than once. However the “Remove Ads” perk is a managed product. This item can be restored and therefor only be purchased once by a player.
The code for both products is already implemented. You just need to replace our test ID with yours. To do so, create two new InApp Products in Google Play / iTunes and enter the ID’s here.
To insert your ID’s open the “es_inapp” event sheet. In the header you’ll find the variables for your ID’s.
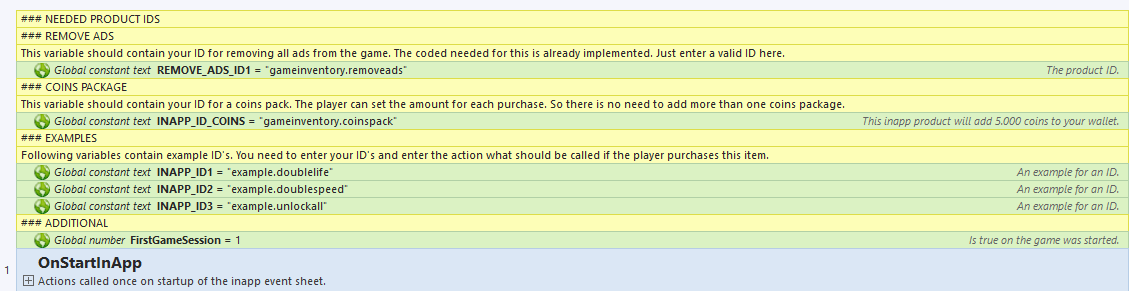
The template also includes three example ID’s if you wish to add more InApp Products. You can find the “On purchase completed” triggers in the “PurchasesCompleted” group.

At the moment the event only sends data to Google Analytics. You can add your code here then. The Remove Ads and Coins Package “On purchase completed” triggers however are completely setup. Just enter a valid ID and it will work.
AdMob Ads
The template uses the CocoonAds plugin by ludei. With this plugin you can include AdMob ads into your game. Just select the “CocoonAds” plugin in your project bar and insert your ID’s. The game will automatically show a banner ad at the bottom of the game.
If you wish to show an interstitial ad, just call following function.
[code]no parameters[/code]
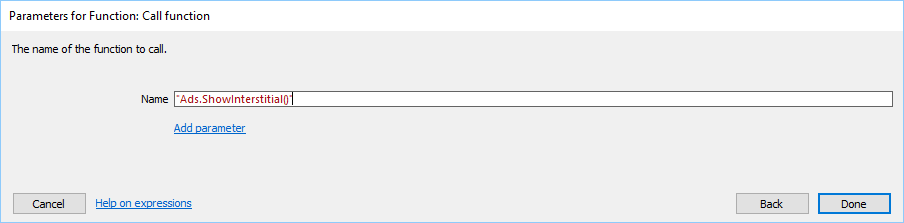
This function call will preload and show an interstitial ad (on each call).