![]()
Live Demo
See the template in action.
[appbox googleplay com.matchtrhee.shatter]
[appbox appstore 1111204649]
We use the same template in our game Match3. There you can see all functions in action!
Welcome!
Thank you for checking out our documentation about our Cross-Platform Game Template (CPPT). Here you’ll find all what you need to start building your awesome game using our template.
Updates & Reviews
Please always check if you’re using the latest version of our template. Just check regulary your download area on scirra.
[creativ_button url=”https://goo.gl/3AFr1I” icon=”download-alt” label=”Scirra – My Downloads” colour=”blue” colour_custom=”” size=”medium” edge=”rounded” target=”_blank”]
If you are satisfied with our item, please rate it 5-stars on scirra. This helps us a lot and encourage us to publish further updates with more cool stuff included.
If you want to get notifed about updates, feel free to join us on Twitter or Facebook. Moreover you can subscribe to our newsletter.
[creativ_button url=”https://goo.gl/f2ynbq” icon=”twitter” label=”Twitter” colour=”blue” colour_custom=”” size=”medium” edge=”rounded” target=”_blank”] [creativ_button url=”https://goo.gl/o2WaiH” icon=”facebook” label=”Facebook” colour=”blue” colour_custom=”” size=”medium” edge=”rounded” target=”_blank”]
Features
CocoonIO
This template is exclusive for CocoonIO and will not work with Intel XDK! You can learn more about cocoon.io here.
[creativ_button url=”https://cocoon.io/” icon=”heart” label=”CocoonIO” colour=”orange” colour_custom=”” size=”medium” edge=”rounded” target=”_blank”]
This template needs some plugins to work (and in order to open the file). Most plugins are available for free, but it also uses Cranberrygame’s Cordova Plugins. So please make sure that you have purchased his Cordova Plugin package available on Scirra.
[creativ_alertbox icon=”ok” colour=”green” custom_colour=””]Please install all listed plugins & behaviors befor you open the project file with construct 2.[/creativ_alertbox]
Used Plugins
(Free) Cocoon Attomic Plugins
This templates uses Ludei’s free Atomic Plugins for Construct 2.
- CocoonCanvasPlus
- CocoonInApps (works for both, Android and iOS)
- CocoonGameCenter (Leaderboard for iOS only)
- CocoonGooglePlayGames (Leaderboard for Android only)
You can download all plugins here.
Cocoon Construct 2 Plugins 0.00 KB 11142 downloads
Download the Cocoon Plugins for Construct 2 now! The download link fetches the latest...If you need a guide showing you how to install those plugins, please see here.
[creativ_button url=”https://shatter-box.com/knowledgebase/cocoonio-how-to-build-a-game-using-construct-2/#document-2″ icon=”book” label=”How to install Cocoon Plugins” colour=”blue” colour_custom=”” size=”medium” edge=”rounded” target=”_blank”]
(Free) TimeAwayL
The template uses Rex’s awesome TimeAwayL plugin for the Reward System. You can download it for free on his website.
[creativ_button url=”http://c2rexplugins.weebly.com/rex_time_awayl.html” icon=”download-alt” label=”TimeAwayL by Rex” colour=”blue” colour_custom=”” size=”medium” edge=”rounded” target=”_blank”]
(Free) SpriteFont+
The template uses thechriskent‘s awesome TimeAwayL plugin for the Reward System. You can download it for free on his website.
[creativ_button url=”https://www.scirra.com/forum/plugin-spritefont_t91528″ icon=”download-alt” label=”SpriteFont+ by thechriskent” colour=”blue” colour_custom=”” size=”medium” edge=”rounded” target=”_blank”]
(Paid) Cranberrygame’s Cordova Package
This template uses following plugins included in Cranberrygame’s Cordova Package.
- Cordova Chartboost
- Cordova Google Analytics
- Cordova Dialogs
If you don’t own this package, please purchase it from here. It includes so many helpful plugins.
Cranberrygame - Cordova Plugins 150 MB 4960 downloads
Download the awesome Cordova Plugin Package provided by Cranberrygame. The package...
Install corresponding plugins in CocoonIO
Please add following plugins to your CocoonIO project:
Cocoon Plugins
- AdMob native Ads for Android
- AdMob native Ads for iOS
- Google Play Games Social API (Add your APP ID to it)
- Game Center Social API
- In-App Purchases for Google Play
- In-App Purchases for iOS App Store
Core Plugins
- Inappbrowser
- Dialogs
Custom Plugins
- Git-Repo: https://github.com/AndreasReitberger/google-analytics-plugin.git
- Git-Repo: https://github.com/cranberrygame/cordova-plugin-ad-chartboost.git
Used Behaviors
(Free) LiteTween
This templates uses lunarray‘s free LiteTween behavior for Construct 2. You can download it here.
[creativ_button url=”https://www.scirra.com/forum/behavior-litetween_t70700″ icon=”download-alt” label=”LiteTween by lunarray” colour=”blue” colour_custom=”” size=”medium” edge=”rounded” target=”_blank”]
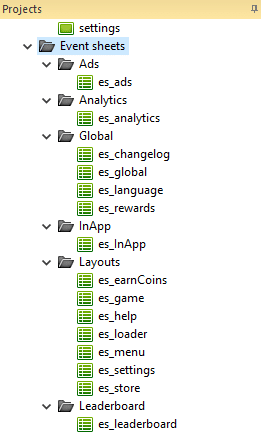
Event Sheets
The project is sorted in its functions. So there is an event sheet for each function included in the project.
- es_inapp (Handles the store functions)
- es_ads (Handles the AdMob Ad functions)
- es_analytics (Handles the Google Analytics functions)
- es_leaderboard (Handles the Leaderboard functions, Game Center and Google Play Games)
Then there are the layout event sheets.
- es_loader (for the loader)
- es_menu (for the menu)
- es_store (for the store)
- es_earncoins (for the earn coins screen using Chartboost)
- es_settings (for the settings screen)
- es_help (for the help screen)
- es_game (for YOUR Game)
The es_game Event Sheet
This is the place were you should code your game. There are a few functions included to show you a possible way to do it. But basically it’s completely up to you how you build your game in there. If you need something from other event sheets, like showing an Interstitial Ad, you just can included the event sheed es_ads into the es_game event sheet and call the function for showing an interstitial ad. You’ll find an overview of all functions in the “Functions” section of this documentation.
The es_global Event Sheet
This event sheet should be included in each other Layout event sheet, due to the fact it handles the LocalStorage and UI functions.
Clean and well commented!
Our project is well structured and well commented.
Seperated in Groups
Well commented
To help you understanding the code better, I have added comments to it.
Localisation
You also get the Localisation system stand-alone!
[creativ_button url=”https://www.scirra.com/store/royalty-free-game-templates/game-template-13-localisation-2512″ icon=”download-alt” label=”Game Template 13 – Localisation” colour=”blue” colour_custom=”” size=”medium” edge=”rounded” target=”_blank”]
This template includes an automtic function for localisation. For this it uses the “languages.json” file included in the Construct 2 project. In order to alter the file, just perform a double click on it.

The languages.json file
The json-file is using keys to identify the language string.
On the first game start this json file will be imported to the “Languages” Dictionary in Construct 2 via AJAX. After that all strings are available in the game and you can access the language by its key.
For this use following format.
[js]/* language = is the variable where the language code will be stored
* _dialog_rateapp_headline = the key from the json file (without de,en, and so on!)
*/
languages.Get(language & “_dialog_rateapp_headline”)[/js]
This will fetch the text assoziated with the key. But see more under “Localize”
Localize
SpriteFont+
Each SpriteFont+ object is included in the “SpriteFontPlus” family. Therefor each SpriteFont+ object has a boolean “IsLocalised” and a string instance variable called “LanguageKey”. Those variables will be used to speed up the the translation and to reduce the needed code for it.
How to localize it
- 1) Set “IsLocalised” to true
- 2) Add the language key (from the json file) in following format
[js]// if the key is “de_howto_game_1” add it like:
howto_game_1[/js]
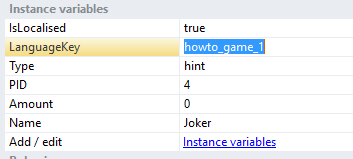
- 3) That’s it
Now it automatically fetches the text from the corresponding key on start of each layout. Just make sure, if you have added additional SpriteFont+ objects, to include them in the “SpriteFontPlus” family.
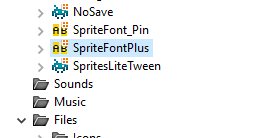
Sprites
If you have any sprite objects with a text on it, please duplicate the animation for each language and name it to the language code.
![]()
For example if you want to support german, english and french add following animations in lowercase!
- de
- en
- fr
Then add the sprite object to the “Sprites” family. This will add the boolean “IsLocalised” to each included object. Set it to true if the sprite has a text on it and it has the needed language animation. Otherwise let it on false.
![]()
The game automatically sets the corresponding animation.
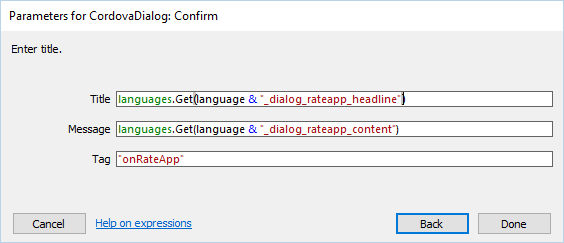
Other
For all other objects, like the Cordova Dialog object, you just can call the language string by following expression.
[js]/* language = is the variable where the language code will be stored
* _dialog_rateapp_headline = the key from the json file (without de,en, and so on!)
*/
languages.Get(language & “_dialog_rateapp_headline”)[/js]
[/creativ_toggle][/creativ_accordion]
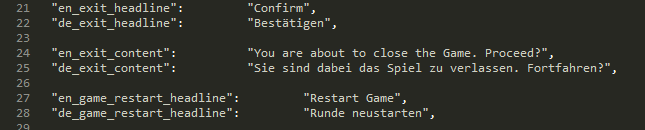
Add a new language
If you want to add a new language, just copy all keys in the language.json file and replace the language code with your language. For example if you want to add french.
[js]”en_back_content”: “You are about to go back to the menu screen. Proceed?”,
“de_back_content”: “Sie sind dabei in das Menü zurückzukehren. Fortfahren?”,
“fr_back_content”: “YOUR TEXT IN FRENCH”,[/js]

Then save your file and open the “es_language” event sheet (located in “Globals”). There you’ll find a variable called “languages”. This variable represent all available languages. If the player has an unsupported language, the system automatically uses the fallback language (mostly english, but it depends on you).
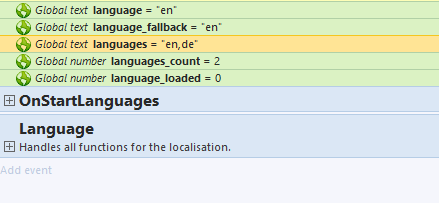
So add fr to this variable.
[js]”en,de,fr”[/js]
Then change the “languages_count” variable to 3 (three supported languages).
Functions
Here you find a list of all available functions which you can use for your game.
InApps
If you want to use InApp functions outside of the es_inapp event sheet, just include this event sheet in the one you want to use the InApp functions.
InApp.FetchProducts()
This function basically gets called on the first start of the game and fetches all listed products from the store. This function should be used only in the es_inapp event sheet.
Make sure that you adjust the list of product ID’s getting fetched from the store. If you try to fetch an undefined product, the fetch process will fail.
Return value: none
InApp.LogProductList()
This function will create a local product list on the device. This is needed in order to access the localized price and name later.
Do not alter this function.
Return value: none
InApp.PurchaseItem()
With this function you can purchase an item. In order to do that you need to pass two parameters.
- Function.Param(0) = The Product ID of your Item (string)
- Function.Param(1) = Amount (integer)
Use the “Product_ID” variables in the header for the Function.Param(0). So it automatically triggers the matching “On purchase succeeded”.
In order to use this function you must include the es_inapp event sheet in the event sheet where you want to use it.

Return value: none
InApp.ConsumeCoins()
With this function you can consume an item. In order to do that you need to pass two parameters.
- Function.Param(0) = The Product ID of your Item (string)
- Function.Param(1) = Amount (integer)
In order to use this function you must include the es_inapp event sheet in the event sheet where you want to use it.
Return value: none
Ads (AdMob)
If you want to use AdMob Ad functions outside of the es_ads event sheet, just include this event sheet in the one you want to use the AdMob Ad functions.
Ads.count
This function can be used to show an Interstital Ad. This functon also includes a counter. So if you call this function, the ad_counter will be reduced by 1.
- If this ad_counter = 1, an Interstital Ad will be preloaded
- If this ad_counter = 0, an Interstital Ad will be shown
The best usage for this function is to call it on each game over. Then, depending on the value of the ad_counter_fallback (for instance 5) value, it will show an Interstital Ad after each fifth GameOver.
Return value: none
There is no function for the banner ad. It will be shown on the specified layouts in the es_ads event sheet.
Google Analytics
If you want to use Google Analytics functions outside of the es_analytics event sheet, just include this event sheet in the one you want to use the Google Analytics functions.
Analytics.TrackScreen()
This function will track the passed screen.
- Funtion.Param(0) = Screen name (string)
This function is already included in the es_global event sheet and it tracks all layouts automatically. So there is no need to do this on your own.
![]()
Return value: none
Analytics.TrackEvent()
This function will track an event for a category.
- Function.Param(0) = category (string)
- Function.Param(1) = event (string)
Call this function whenever you want to track a special event, for instance a button click or something in that way. You’ll find a lot of examples in the included event sheets.
![]()
Return value: none
Global
If you want to use global functions outside of the es_global event sheet, just include this event sheet in the one you want to use the global functions.
UI.UpdateCoins()
This function updates the SpriteFont+ Object in the UI to the current value of the “coins” variable. Call this function whenever the coins variable has changed its value.
Return value: none
Sys.ScoreUpdate
This function updates the SpirteFont+ Object in the UI to the current HighScore and Score currently stored in the HighScore and CurScore variable. Call this function whenever the HighScore or/and CurScore variable has changed.
Return value: none
Game.CalculateCoins()
This function calculates the amount of coins which a player wins after he / she has lost the game. You can alter this function to fit your needs.
Return value: AwardedCoins
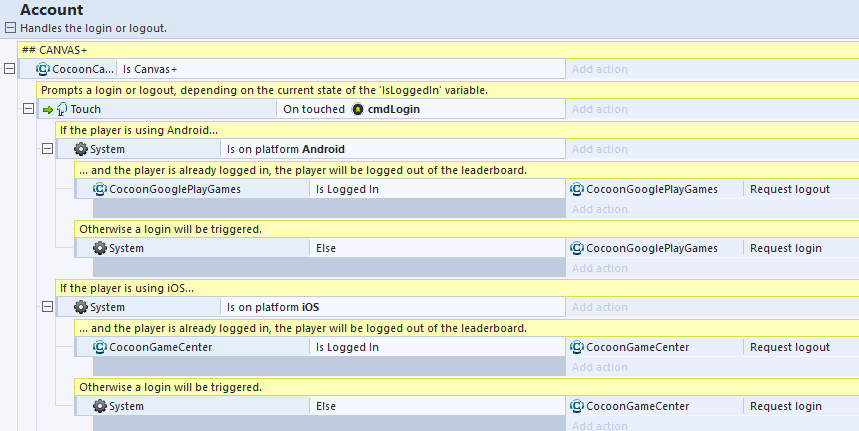
PlayService.Login()
This function calls a login to the leaderboard. It picks automatically the right one, depending on the device platform (OS).
Return value: none
PlayService.SubmitAchievement()
This function submitts the passed achievement ID to the corresponding leaderboard. Due to the diffrent ID’s on iOS and Android this function must be called depending on its platform.
- Function.Param(0) = Achievement ID (string)
In order to do this, you can submit the achievement like this.
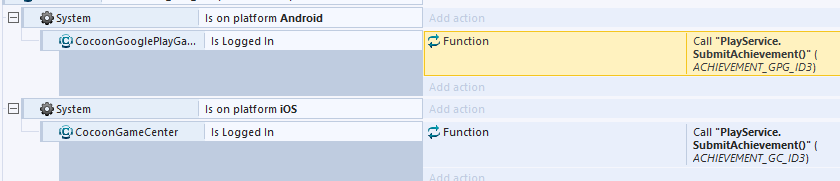
You should pass the variable for it.
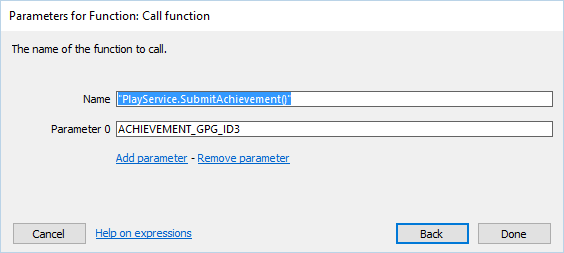
Return value: none
Monetize
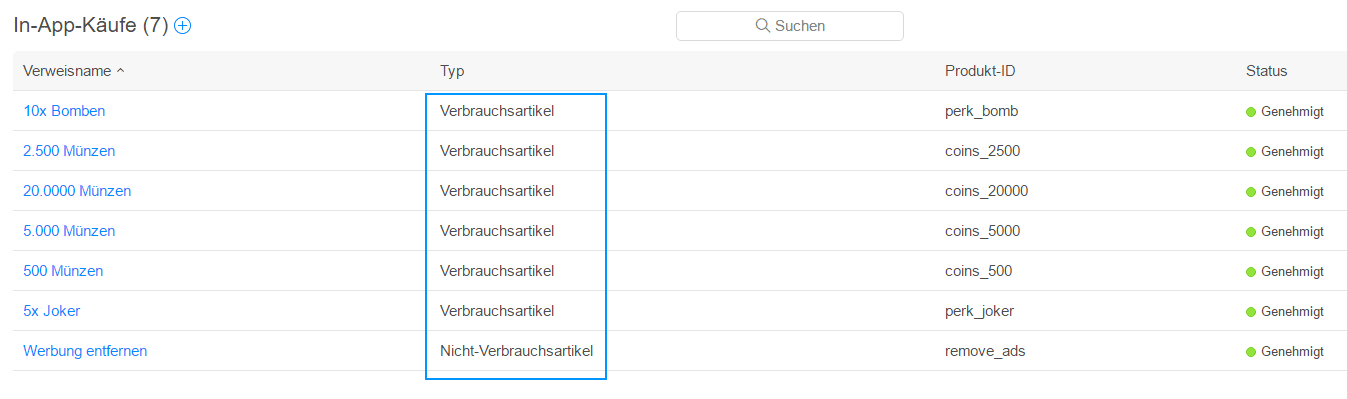
InApp
This template comes with a completely working InApp function allowing your player to purchase
- a “Remove Ad” Perk
- four diffrent coin packages
In order to use this function in your game you musst add your Product ID’s in the header of the “es_inapp” event sheet.
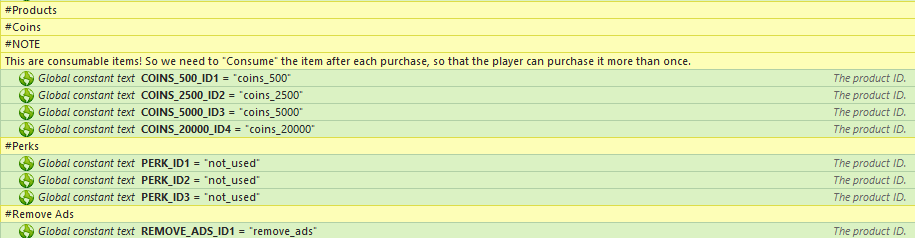
The easiest way is to copy the ID’s from the template and use them while creating your InApp products in iTunes / Google Play.
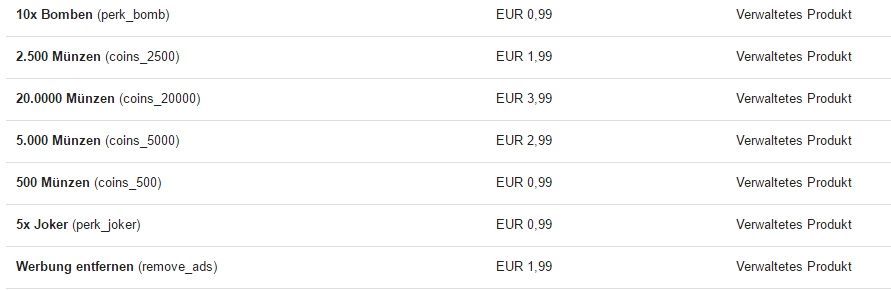
Google Play
Here you can add all items as “Managed”. The coins package will be automatically consumed after the had been purchased. Otherwise it wouldn’t be possible to purchase it again.
If you need help with creating an InApp Product in Google Play, please visit this guide.
[creativ_button url=”https://shatter-box.com/knowledgebase/android-create-inapp-products/” icon=”book” label=”Google Play – Add InApp Product” colour=”green” colour_custom=”” size=”medium” edge=”rounded” target=”_blank”]
iTunes
However in iTunes you have to create a “Consumable” Item for the coin packages and a “non-consumable” item for the Remove Ads Perk.
If you need help with creating an InApp Product in iTunes, please visit this guide.
[creativ_button url=”https://shatter-box.com/knowledgebase/ios-add-inapp-products/” icon=”book” label=”iTunes – Add InApp Product” colour=”blue” colour_custom=”” size=”medium” edge=”rounded” target=”_blank”]
AdMob
In order to use the Interstital Ads and the Banner Ad in your game, you need to add your AdMob ID’s to the CocoonAds Plugin (located in Construct -> Plugins folder). You can create those ID’s in your AdMob Dashboard.
[creativ_button url=”https://apps.admob.com/” icon=”user” label=”AdMob – Dashboard” colour=”red” colour_custom=”” size=”medium” edge=”rounded” target=”_blank”]
Chartboost
In order to use the Rewarded Video Ads in your game, you need to add your
- Android App ID
- Android App Signature
- iOS App ID
- iOS App Signature
to the Cordova Chartboost Plugin (located in Construct -> Plugins folder). You can create those ID’s in your Chartboost Dashboard.
[creativ_button url=”http://chartboost.com/” icon=”user” label=”Chartboost – Dashboard” colour=”green” colour_custom=”” size=”medium” edge=”rounded” target=”_blank”]
Tracking
In order to use the Google Analytic Tracking functions, you have to add your Google Analytics ID to the Cordova Analytics Plugin (located in Construct -> Plugins folder). You can create one in your Google Analytics Dashboard.
[creativ_button url=”https://analytics.google.com/analytic” icon=”user” label=”Google Analytics – Dashboard” colour=”blue” colour_custom=”” size=”medium” edge=”rounded” target=”_blank”]
You can compile this project to Android and iOS using Ludei’s CocoonIO.
Build
Please see our guides below.
[creativ_button url=”https://shatter-box.com/knowledgebase/cocoonio-how-to-build-a-game-using-construct-2/” icon=”book” label=”How to build with CocoonIO and Construct 2″ colour=”dark-gray” colour_custom=”” size=”medium” edge=”rounded” target=”_blank”]
This guide will show you how to export, configure and compile your game using Ludei’s CocoonIO and Scirra’s Construct 2.
Platform specific
[creativ_button url=”https://shatter-box.com/knowledge-base/publish-your-game-to-google-play-android/” icon=”book” label=”Publish to Google Play” colour=”green” colour_custom=”” size=”medium” edge=”rounded” target=”_blank”] and/or [creativ_button url=”https://shatter-box.com/knowledge-base/publish-your-game-to-itunes-ios/” icon=”book” label=”Publish to iTunes” colour=”blue” colour_custom=”” size=”medium” edge=”rounded” target=”_blank”]
Those guides above will show you how to publish your games on Android or/and on iOS.